This page contains some of our protocols, best practices, and important safety information, an example of a completed Anthropology service request, and details about some of the analytical methods we use. This is not a comprehensive list. If you have questions about the documents here, or there is a protocol or method about which you are curious, please contact Dr. Gordon at gwyneth.gordon@asu.edu for information.
GEL Procedures, Protocols, and Information
EA Methods
δ13C and δ15N by EA:
I. Principles of the Elemental Analyzer
II. Quantitative and Isotope analysis
III. Sample preparation
IV. Sequence Setup (how to set up the sequence based on sample type)
V. Data processing
I. Principles of the Elemental Analyzer
The Elemental Analyzer (EA) operates by combustion and reduction of material to produce CO2, N2, H2 O, and SO2 (when set up for sulfur analysis). The general sequence is like this:
A solid sample wrapped in a tin (or silver) capsule is dropped into a combustion reactor at 1000°C. A pulse of oxygen is timed to flow through the reactor at the time the sample is dropped. Combustion products are: CO2, H2O, NxOy, and SO2. Unreacted O2 from the initial oxygen pulse is also an effluent.
The effluent from the combustion reactor then flows through a copper reduction furnace at 650°C. Unreacted O2 reacts with the copper to form CuO and thus is removed from the gas stream. CO2and H2O are uneffected by the reduction furnace whereas the nitrogen oxides are reduced to elemental nitrogen (N2). The gas stream then flows through a magnesium perchlorate trap. Here water forms a hydrate with the Mg(ClO4)2 and is removed from the gas stream. CO2, N2 and SO2 continue on through the system.
Gases then flow through a molecular sieve packed GC column at 60°C where they are differentially retained. N2 flows through the GC column the fastest followed by CO2 and much later by SO2.
The effluent from the GC column passes over a TCD (Thermal Conductivity Detector) before it leaves the EA. In systems which provide only quantitative results the TCD is used to quantify CHNS. In our system, the mass spectrometer provides the quantitative data anyway so we do not use the data feed from the TCD.
Effluent from the EA is then split and released into an open split in the Conflo III interface
The Conflo III is the source of the sample gas and reference gas for the isotope ratio mass spectrometer.
For good (good means both accurate and precise) isotope ratio measurements it is essential that all of the carbon and nitrogen in the sample gets converted to the final analysis gases CO2 and N2 . If the combustion is not complete, or is too slow, then the numbers will not be correct. Additionally, the amount of nitrogen or carbon required to get good quantitative results is far lower than that required to get good isotope measurements. For quantitative analysis samples should have a minimum of 1ug of C or N. For good isotope ratio measurements we require a minimum of 25ug of N (gives a 1V peak in isodat) or 12ug of C (gives a 1.5V peak in isodat). Samples should also not exceed 1.1mg of N or 3mg of C.
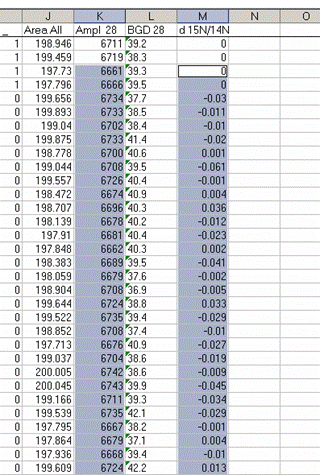
Here is an example of what a chromatogram looks like for a typical organic compound (glycine):
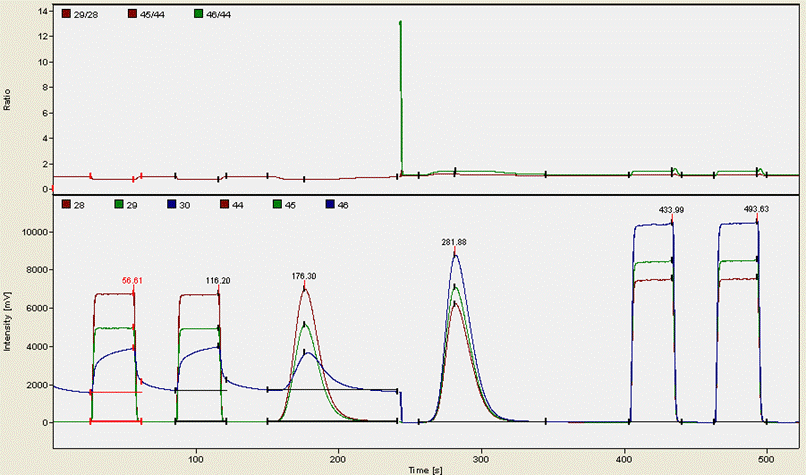
The first two "square" peaks are nitrogen gas from a compressed gas cylinder (ref gas), the following peak is sample nitrogen. The funny drop in the blue trace at about 250 seconds is due to the magnet jump to start monitoring CO2 isotopomers. The CO2 trace occurs at 282 seconds here and then is followed by two ref gas peaks of CO2 from a compressed gas cylinder. It is important to note that although we use gases from compressed gas cylinders as a reference point throughout the sequence, we use real working standards (i.e. calibrated materials that run through the EA just like every sample) to rescale the measured isotope ratios to the VPDB and AIR scales. The square peaks are only necessary for isotope analysis and play no role in quantitative analysis.
II. Quantitative and Isotope analysis:
Why do we need more material for isotope ratios than for quantitative analysis?
The answer is that one factor that limits the precision (standard deviation) of the measurement is closely equal to the square root of the number of counts (ions observed). At lower sample sizes the amount of carbon or nitrogen that makes it into the ion source simply is not enough to reduce the precision to the levels that the instrument itself can usually achieve. Here is an example of what one sees with varying amounts of a sample containing nitrogen:
Here is the calibration curve:

It's a great calibration curve!
And here is what the isotopes look like for the same set of samples:

The standard deviation for the five measurements with areas greater than 10Vs is 0.12‰. The standard deviation of the three points below 10Vs is about 2‰. Note that the instrument will always give a number, however, to evaluate the accuracy and precision of that number it is necessary to perform a check like that shown in the plot above.
III. Sample preparation:
Some things to think about concerning EA samples:
It is primarily up to the user to prepare their samples correctly for isotopic analysis. That being said, we are very happy to discuss what should/can be done to ensure that the samples submitted for analysis are correct representations of what the user is after.
Homogeneity: it is important that the sample be isotopically homogenous prior to analysis. For soils, this requires drying of the sample at 60°C for 48 hours followed by use of a ball mill for 10 minutes.
Here are some illustrations of the importance of sample homogeneity using dirt collected from outside our building and dried for 48 hours at 60°C. The dirt was then placed in a ball mill and aliquots were removed after specific time segments so that the total milling time is shown in the plot below.
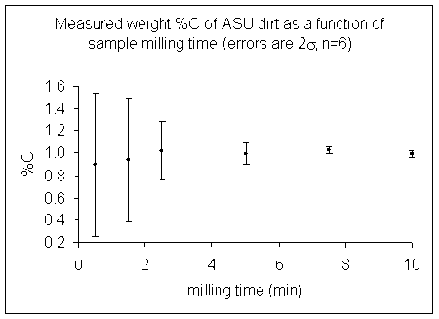
(Need new pictures these are hard to read)
(Data collected by Dave Baysinger for his honor's thesis)
Note that the dirt we started with had some small pebbles in it as well as lots of dust. We only weighed out about 1mg of material for the actual measurement so it is quite easy to get a significant variability in the amount of carbon in any given sample.
Here is a look at the relative standard deviation (stdev/mean x 100) from the same set of samples.
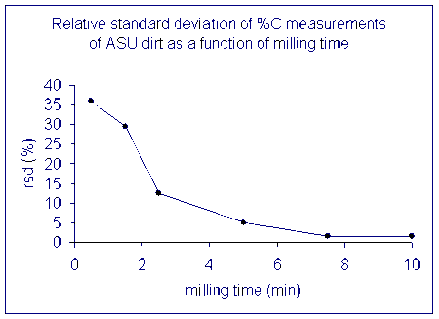
(Data collected by Dave Baysinger for his honor's thesis)
The lesson is that it is important to have a homogenous sample in order to get numbers that actually reflect the overall sample. For a real sample with similar variability as our dirt, a single measurement after milling it for only 2 minutes could have come out anywhere between 0.4 and 1.5 wt% C. That's a huge range for this instrument!
Inorganic vs organic carbon
The carbon in a soil sample may be of organic and inorganic origins. Analyzing a sample without addition of acid will give a carbon isotope ratio that reflects a weighted average of the inorganic and organic carbon isotope ratio of the sample. In order to determine the isotope ratio of only the organic carbon, it is necessary to add HCl to drive off carbonates prior to isotopic analysis. We recommend using 5 times more HCl than is necessary to neutralize all of the inorganic carbon in the sample assuming that it is present as a carbonate salt (i.e. you will need two moles of HCl to neutralize one mole of CO32-).
How much acid should you add? It is necessary to add a minimum of the stoichiometric equivalent of H+ to neutralize the carbonate. The best is to add an excess of acid (at least 10 times the stoichiometric equivalent). This is what happens to the isotope ratio of a sample as carbonate is removed:
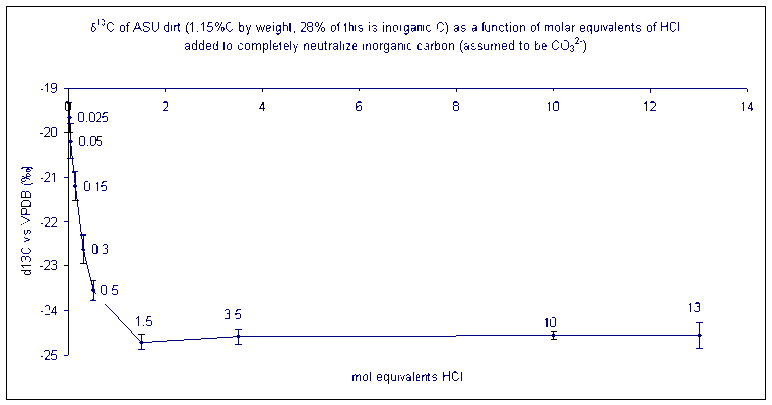
(Data collected by Dave Baysinger for his honor's thesis)
The numbers by each data point give the ratio of equivalents of acid needed to neutralize all of the carbonate in the sample. (i.e. at a value of 1.5 enough H+ has been added to completely neutralize 150% of the carbonate that was originally in the sample)
Sample size: how much can you weigh out?
The EA can efficiently combust samples up to roughly 50 mg in size with fairly low amounts of C or N.
IV. Sequence Setup (how to set up the sequence based on sample type)
Sample sequences:
When using samples that require dilution of CO2 (ie. you are weighing out large amounts to access the nitrogen, or you are running organic matter such as plant leaves), use this sequence as a template.
Here is an example of a sequence viewed with Isodat Worksace:
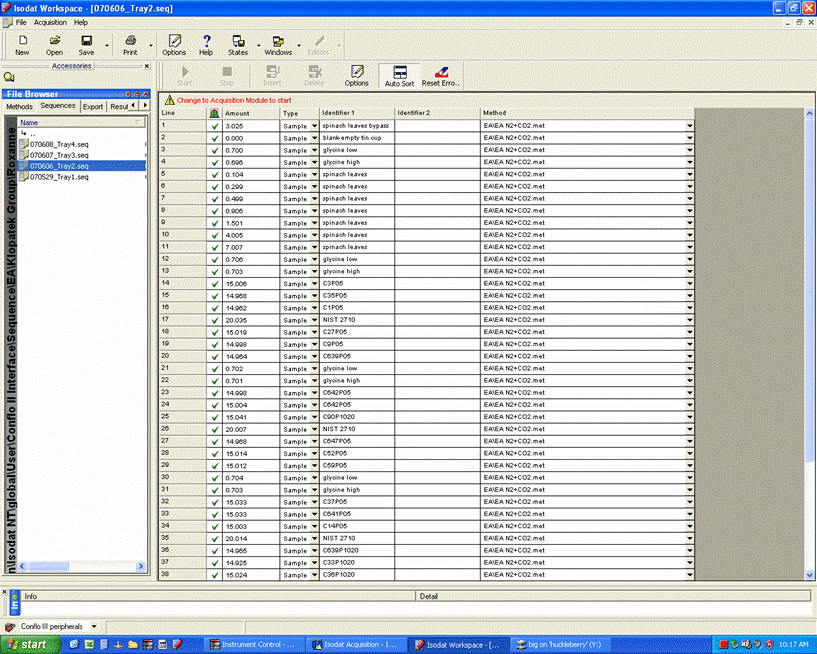
When using samples that do not require dilution of CO2 (usually this is for samples with very low weight % C and/or no nitrogen isotope ratios will be measured), use this sequence as a template.
V. Data processing
Although it is possible to have all of the data processing done in an automated fashion, new users will not understand how these results are obtained. For any data of significance it is of most value for the owner of the results to understand how the results were obtained. Consequently, in the Keck Lab we require users to manually process the results for their analyses. We provide training and then the tutorial provided here (and elsewhere for other methods) are intended to help remind you how to get the results. There are a lot of details that the analyst may think about when processing results, however, it is very difficult to explain them all. It is advised that all data sets generated in the lab be shown to a lab supervisor (Natasha or Stan) for verification prior to publication.
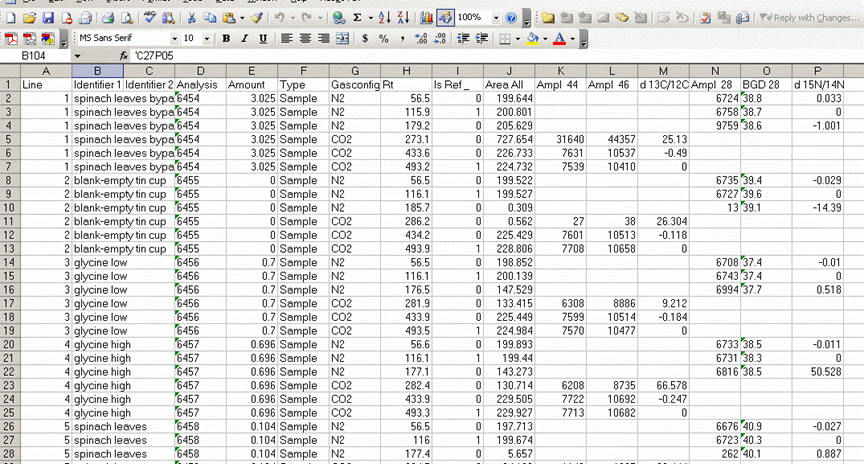
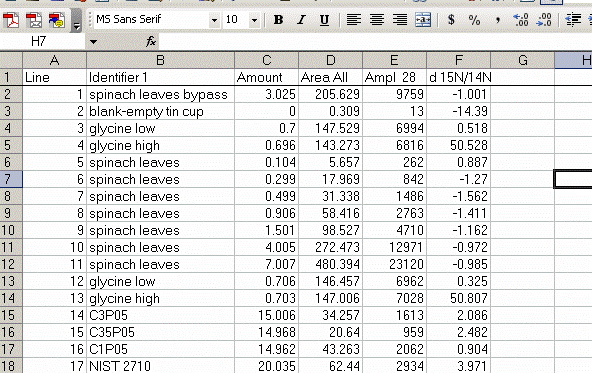
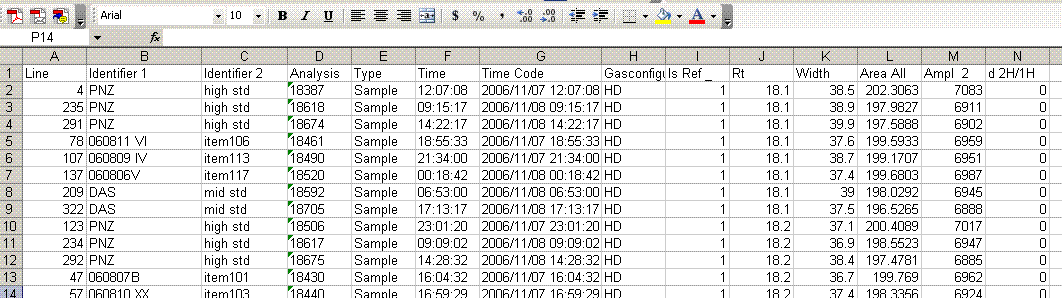
Here is the data file used for the following example of data processing.
Before starting to export your results, make sure that no analytical sequence is currently running! Isodat can lose data if exporting results while it is acquiring data.
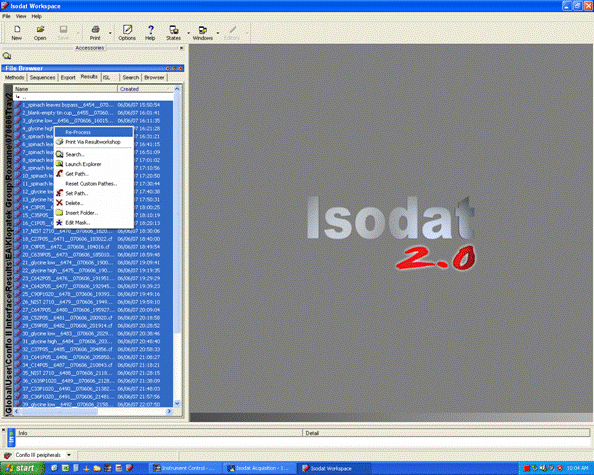
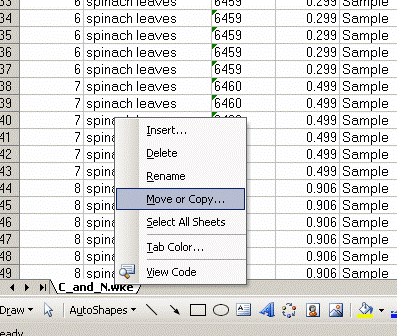
1. Export your results. In Workspace, find your data files, highlight them all, then right click:
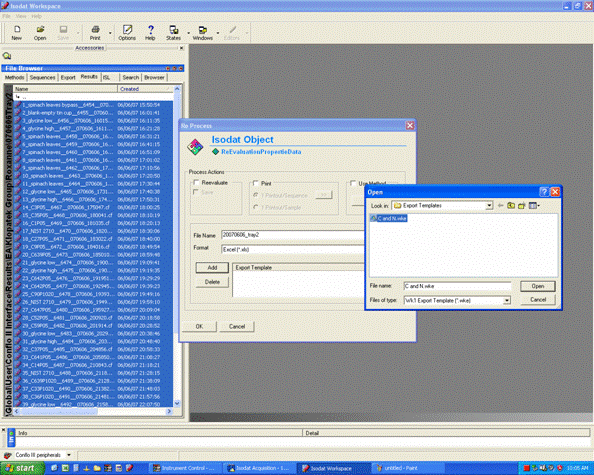
2. Click on "reprocess" and go ahead and then click on "add" to add the export template. Choose the appropriate template (probably there is only one listed), After selecting the template, change the file name for the exported spreadsheet to something that describes what the samples are. Typically, we recommend keeping the analysis date in the file name as well. Allow 5-10 minutes for Isodat to export your results. Do not use the computer while it is doing this and NEVER export while a sequence of samples is running!!!
3. Once the export is done, you should click on the "results" shortcut on the start bar at the bottom of the screen and go find your results. Open your spreadsheet and it should look like this:
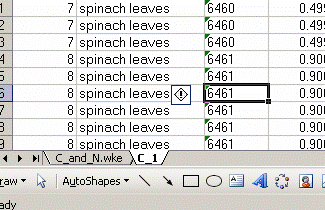
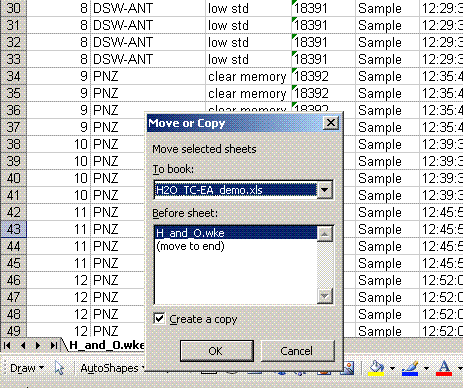
4. Right click on the bottom tab and select "move or copy", then choose "make a copy" and "move to end". Rename the new worksheet tab "C_1":
Renamed:
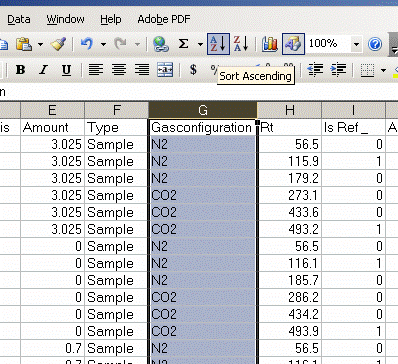
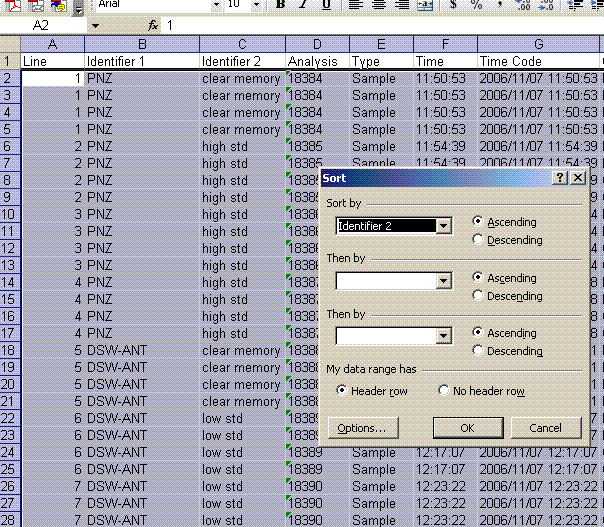
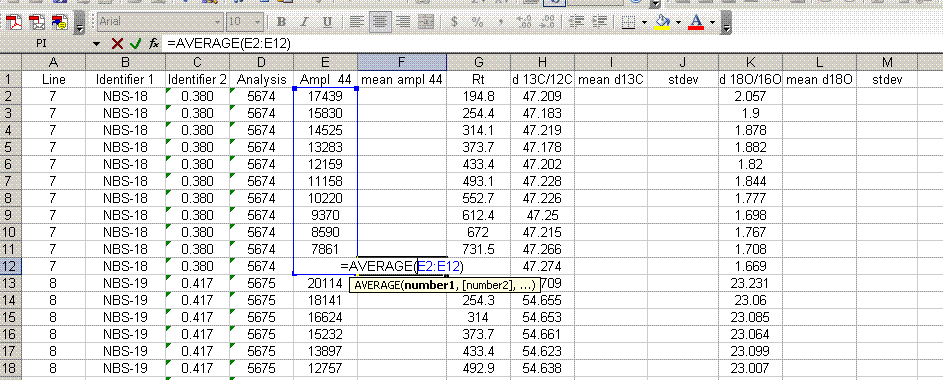
5. Sort results by element. To do this, highlight the "Gasconfiguration" column and choose the "A to Z" sort option:
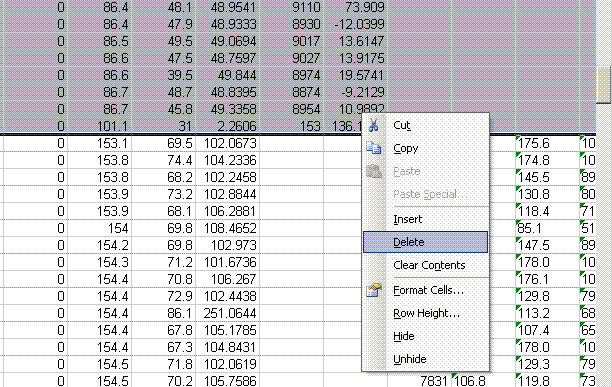
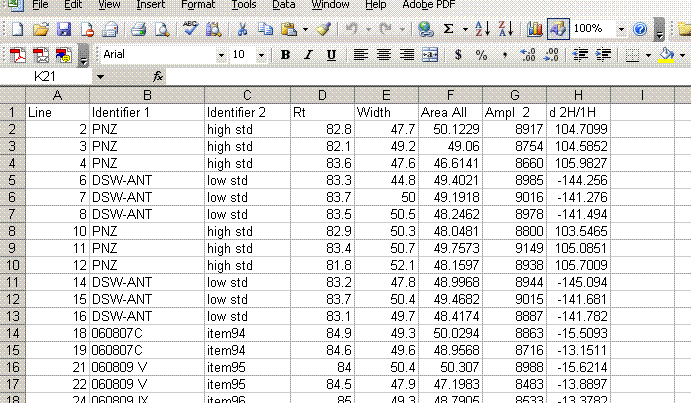
6. Copy this worksheet into a new one (use the tab at the bottom of the page) and call the new worksheet "N_1". In this new worksheet, delete all of the data with a CO2 gas configuration, then highlight the "Rt" column and select the "Z to A" sort option. Note that Rt stands for "retention time", which is the time at which the peak was detected.

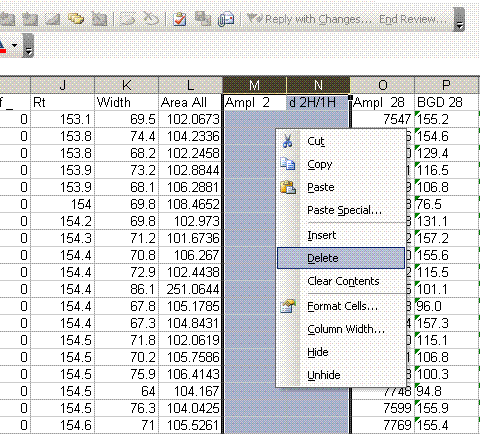
7. Delete the columns relating to CO2 from the nitrogen worksheet:

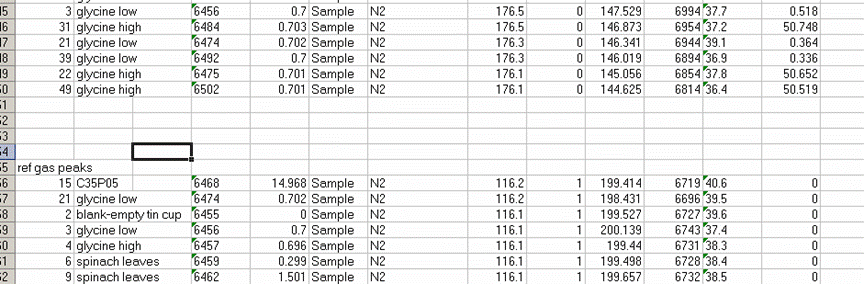
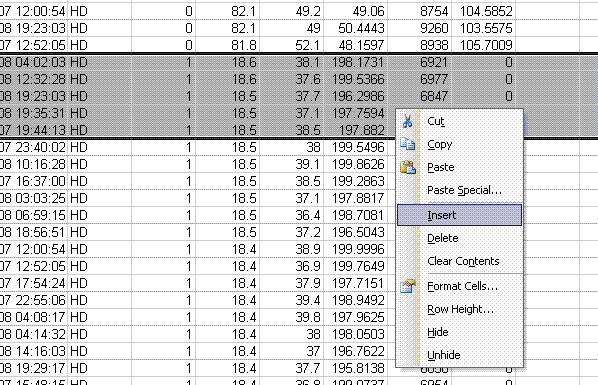
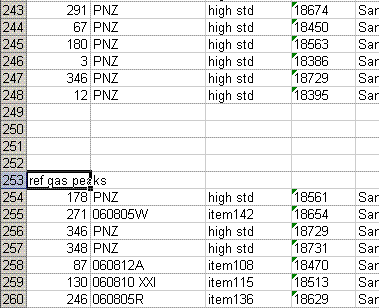
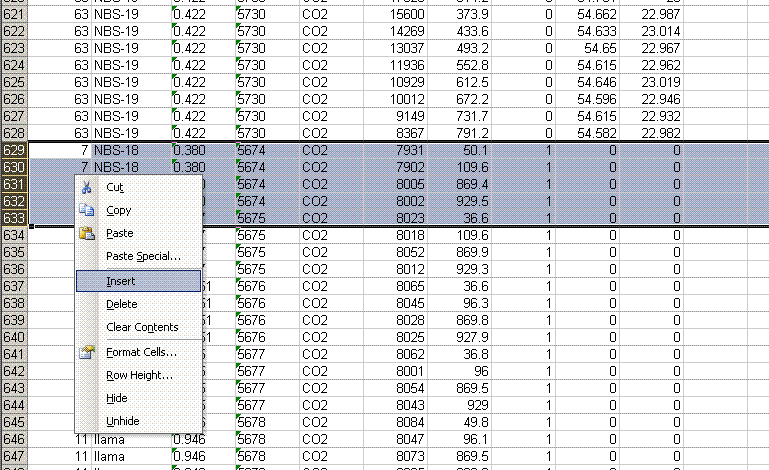
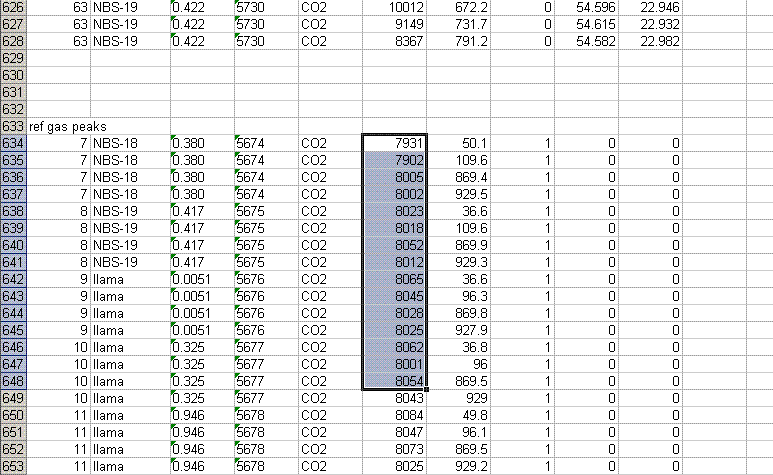
8. Recall from the data file shown at the top of this page that the first two peaks to be observed are the square nitrogen reference gas peaks. After them we will see the sample nitrogen peak. Consequently, by sorting in reverse Rt, the first data in the spreadsheet are for the sample gas peak and the later peaks are for the reference gas peaks. Find the point where the reference gas peaks start to show up and insert 5 lines to separate them from the sample gas peaks. In the cell just above the ref gas peaks write in "ref gas peaks":
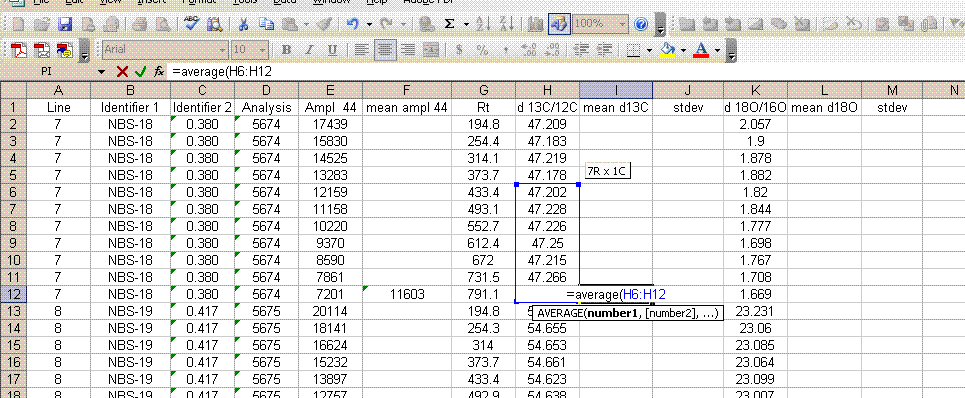
9. Inspect the columns for the m/z 28 amplitude of the ref gas peaks. They should all be pretty close to the same value. If you see a significant deviation (perhaps 1 or 2 volts or more) from the mean, then there may be a spike or dip occuring on that peak. Although it is very rare, this is a quick quality control check to find such things. Also, the first reference gas peak is measured against the second one. Although this does add time to the analysis, it provides an added level of quality control in that one can see if there are baseline problems causing significant deviations in the measurements. The ref gas peaks should all have values that are close to zero. See below:
10. Copy the N_1 worksheet into a new worksheet and call that one "N_2". In the new worksheet delete all of the reference gas peak results. Then sort your results by line number:

11. Delete the extraneous columns (see below).
12. Copy the "N_2" worksheet to a new worksheet and call it "N_quant". You will use it to calculate quantitative results for your samples. In the "N_quant" worksheet, delete the column for isotope ratios and add the columns shown below:

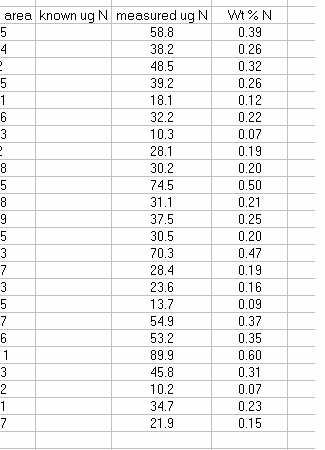
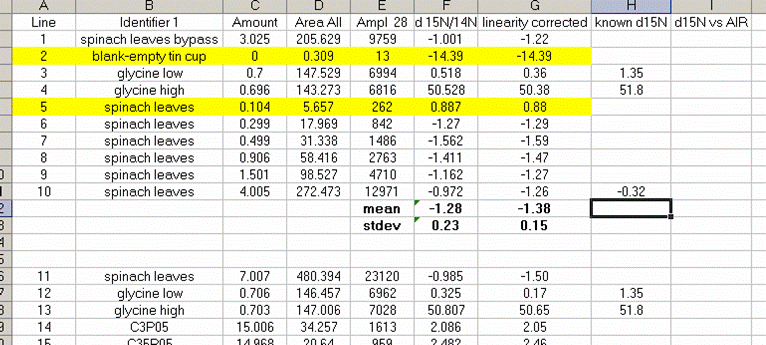
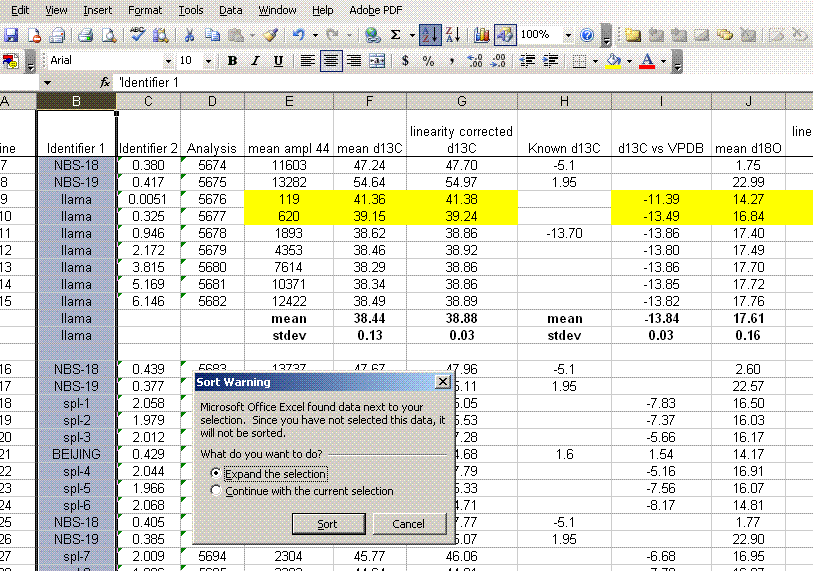
13. Sort the results by "identifier 1". Then group the data (use "cut" and "insert cut cells") as shown below with the blank capsule first, followed by the linearity standards (spinach leaves in this case), then any other standards, and finally the samples.
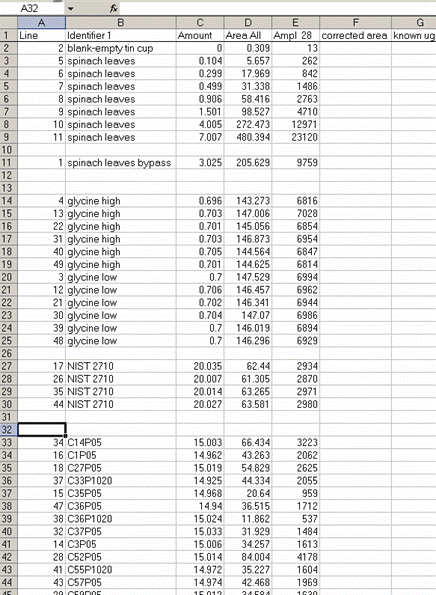
14. Subtract the "area all" of the tin capsule blank from all other sample areas. For example, in the sheet above for the first NIST 2710 standard (cell F27), use the formula: "=D27-D$2". If this isn't clear, take a look at the formula used in the attached spreadsheet. In the column for "known ug N" calculate the weight of nitrogen in the provided standards. The spinach leaf standard has a composition that is known to be 6.07% N by weight. It is also 38.85% C by weight. Again, see the formulas in the linked spreadsheet if you have any difficulties calculating this. Be sure you understand how this is calculated!

15. Plot the known ug N as a function of the corrected area for the linearity standards, this is your calibration curve for N. If you are not familiar with excel, ask someone to help you with this. Then choose "xy scatter" and go through the options. make sure the provide a title and label the axes appropriately. Although it may be tempting to cut corners now, it is so much easier to figure things out one year later if they are presented well. See image below for labels and titles. Please, please, please delete the gridlines and remove the legend.
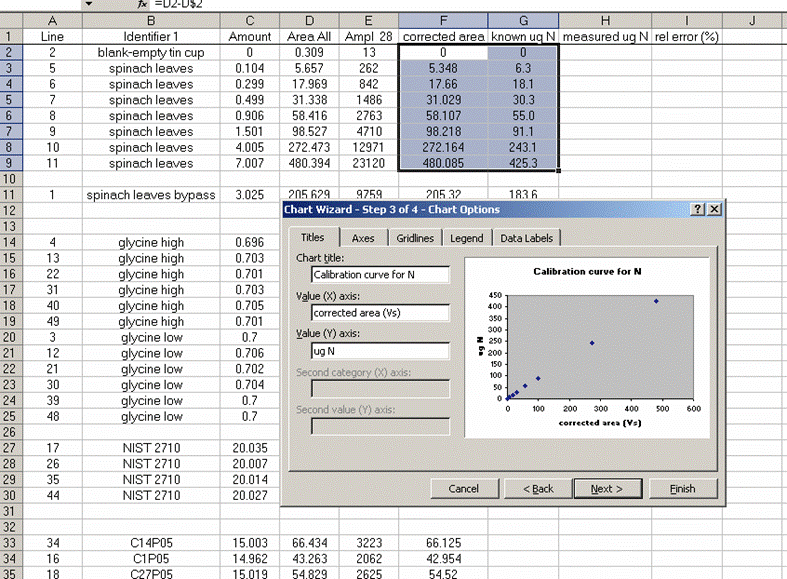
16. Click on "finish", then right click on a data point in the plot and select "add trendline". Choose the "linear" trendline then go to options and select "set intercept to 0", "show equation", and "show R squared".
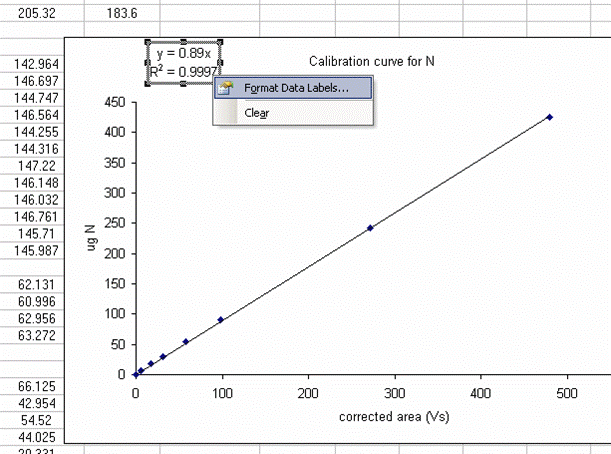
17. The slope of the line shown here tells us how many micrograms of nitrogen produce the observed corrected area. We will be multiplying it by the corrected area for the samples (and standards) so it is important that we are not limited in significant figures. In the plot shown above, the slope was only provided with two significant figures, yet we are going to multiply it by the corrected area, which is measured with much better precision. To avoid limiting our final results, right click on the equation for the line and choose "format label", then go to "number" and choose "number" with 5 decimal values.
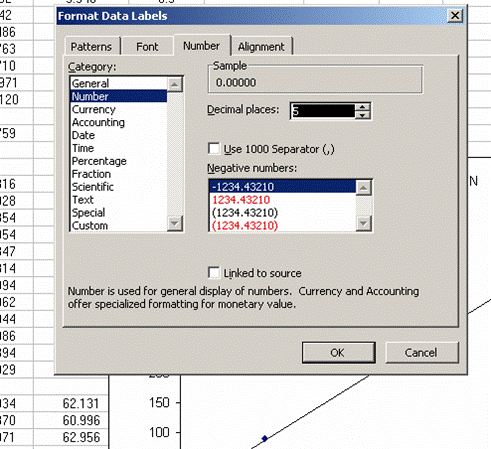
This changes the equation to y=0.88997x
18. Calculate the "measured ug N" by multiplying the line slope by the sample (and standard) corrected area. Finally, for the standards, calculate the relative error of the measurement: =(known-measured)/known x 100
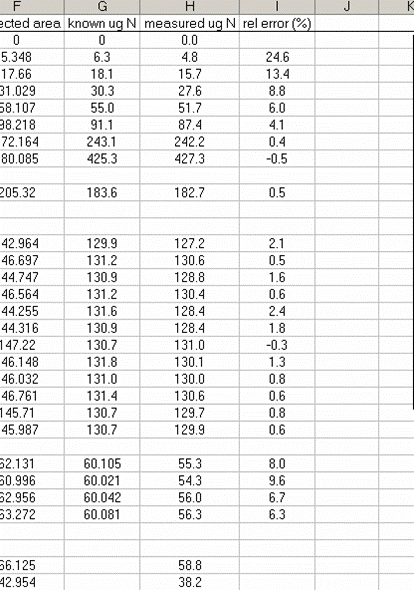
19. Plot the relative error for the linearity standards (Spinach leaves) as a function of the measured ug N. As extra credit, you can add extra data series to the plot showing where your other standards fall on the plot. This one is particularly nice:
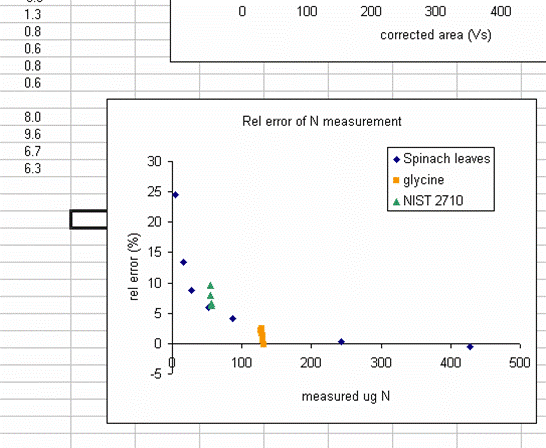
The plot above shows that the relative error of your measurements (for the standards at least) gets bigger for smaller amounts of nitrogen in the sample. This is to be expected and we also see that the relative error of the glycine and NIST 2710 measurements fall on this curve (this part is a bit lucky, they could just as well be biased in the opposite direction). The value of this plot is to allow you to estimate the relative error of the measurement of your sample (we are talking accuracy here and not precision). For example, if the sample you are concerned with had a measured weight of N of 25ug, then you can guess that the relative error in that measurement is around 15%. For larger samples, it might be less. In general we suggest that you apply an error estimate of 10% of the measured value (so a measurement of sample composition as 1.0% N is really 0.9 to 1.1% N by weight) but for small amounts of N you should use the relative error plot to estimate the error for your sample. Note that it is very difficult to estimate the error of a sample measurement when the sample has less nitrogen than the lowest standard that was run. In such cases, it is better to weigh out as much sample as possible and rerun it later on.
20. Copy the headers from the top of the page and paste them above your sample results. You can delete the "rel error" header for your samples and instead label that column as "wt % N". If you are measuring samples collected on filters then this may not be necessary, but for anything else, calculate the wt % N for your samples. Don't forget to convert from ug N to mg N in the calculation.
You now have your quantitative results for nitrogen, now on to carbon:
21. Copy the "N_2" worksheet to a new worksheet called "N_isotope" and add the column headers shown below:
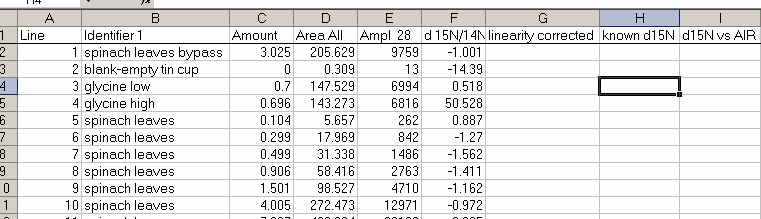
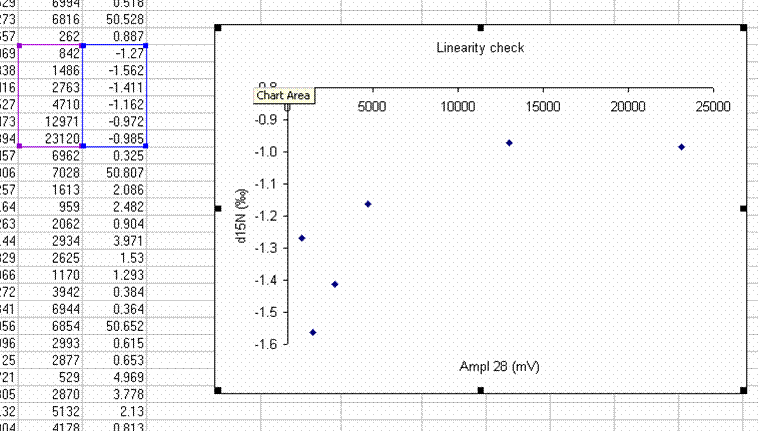
22. Plot the d15N/14N as a function of the Ampl 28 (or of the area, it doesn't make much difference). Label your title and axes as shown.
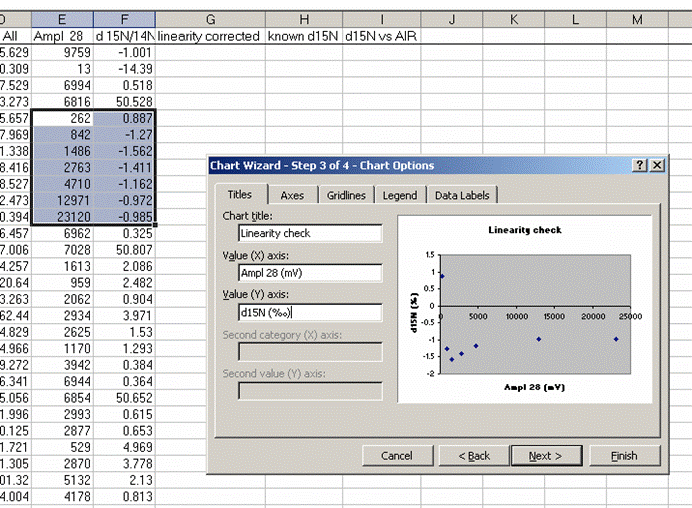
Here's a close-up of the plot:
The above plot shows what looks like very stable isotope ratios from about 2V to 23V. There is a drop around 1V to 2V, and in particular, the first data point, at 0.3V, is way off from the rest of the data set. Ideally this plot would show identical isotope ratios for all peak amplitudes. The phenomenon observed above is fairly typical. At some point when the signal gets too low we can no longer make good isotope ratio measurements. The value of this plot is to inform us as to where that happens and also to allow us to make some corrections for any effects related to sample size (linearity effects). From this data, we see that the first point is too low in signal for a good measurement so we will drop it from the plot and throw out results for any samples that have peak amplitudes below 842mV (the amplitude of the second point).
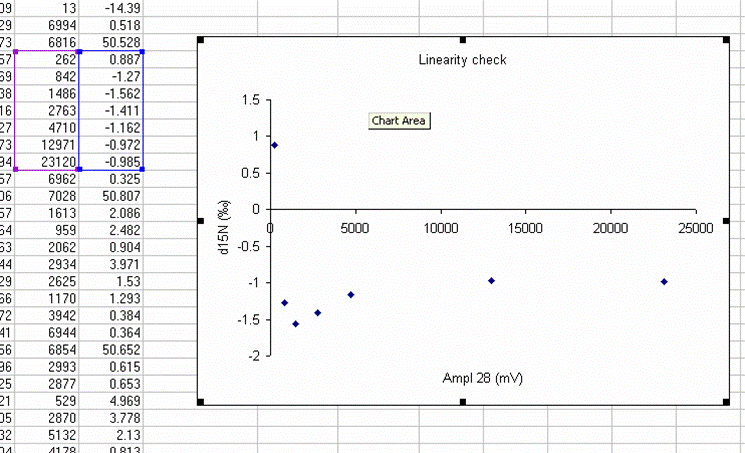
23. Remake the plot without the first point. You may need to rescale things so that you really fill in the plot area with the data points:
With the plot expanded and the first data point dropped, we see that the isotope ratio measured for the rest of the linearity standards covers a range of about 0.6 to 0.7‰ over a range of amplitudes covering 22 V. The standard deviation for the data points observed above is 0.23‰, which is not bad at all. If we fit a line to this data, then we can make a small correction for the linearity effect we see over this range. (Note that there are more complex ways to go about making linearity corrections, but a line fit for this data set will be good enough and easier to explain)
Finally, since we have observed that the isotope ratio measurement behaves poorly below 842 mV we must go through the sample data set and flag every sample that has a nitrogen m/z 28 amplitude of less than 842 mV. We must flag those samples so that we know that the numbers are not reliable for them.
24. Add a trendline to this plot and choose "show equation" and "R-squared". The correlation coefficient does not have to be good. In general it is lower when the data is better behaved (i.e. no change in isotope ratio with sample size).
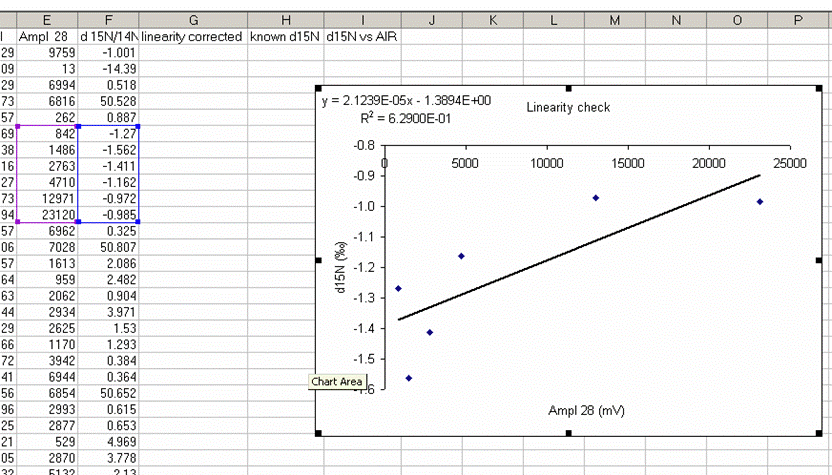
This plot shows that as you increase sample size, there is a change in the measured isotope ratio. Clearly for larger sample sizes this effect disappears, but it is more pronounced for smaller sample sizes. Our attempt is to slightly improve the data set, not to make it perfect. The intercept value for this equation is dependent on the specific sample, so we will not use the intercept in the linearity correction. The appropriate formula for the linearity correction is: CV = OV - (M x A), where CV is the Corrected value, OV is the Old value, M is the slope of the linearity line, and A is the amplitude of the peak for the sample. For more clarity, see the spreadsheet provided with this tutorial.
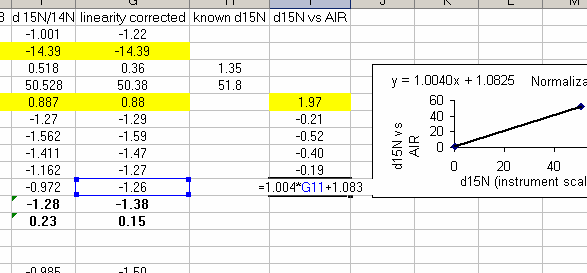
25. Calculate the linearity corrected value for all samples and standards. In addition, insert three lines between the last linearity standard and the next line. Calculate the mean and standard deviation for the linearity standards that were used for the linearity correction. Now use the known values of the isotope ratios for the standards (click here for a quick list) to fill in the "known d15N" for the standards.
In the above plot we see that the standard deviation for the linearity corrected linearity standards has gotten smaller. This will ALWAYS be the case. At worst, the value will not change. If the linearity corrected standard deviation increases then you made a mistake in writing the equation or something else.
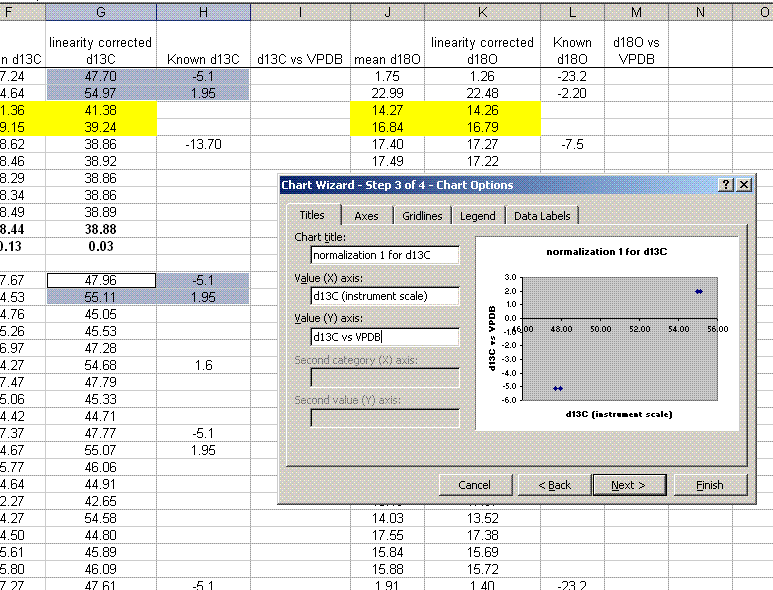
26. Plot the known d15N of the high and low standards as a function of the linearity corrected d15N. Be sure to label title and axes correctly as shown below:
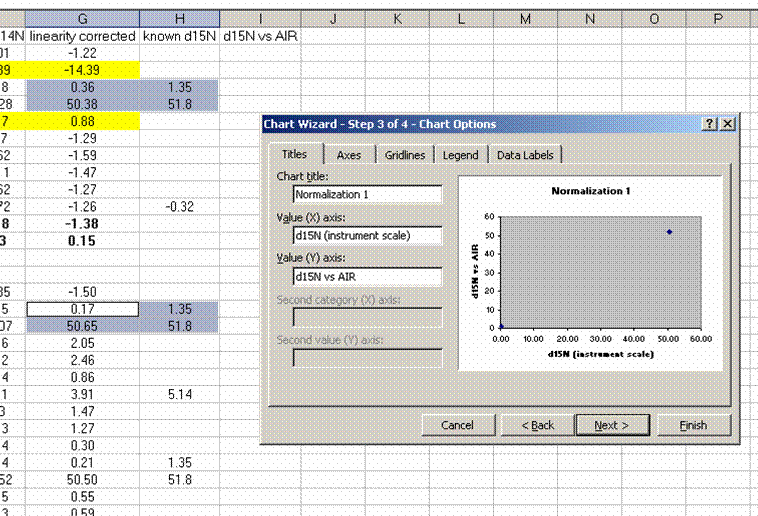
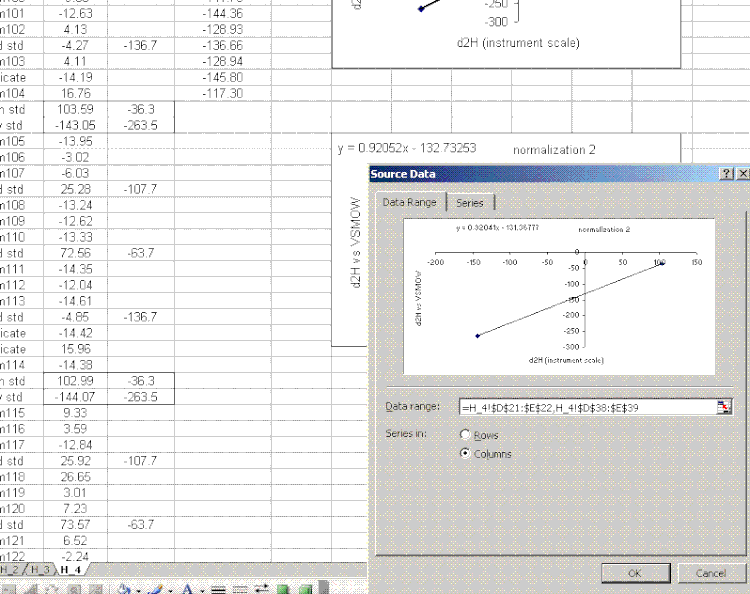
Note: make sure that excel identifies the data as "columns" and not "rows" in the initial plot preview. If your normalization lines look like two data sets instead of one, then excel probably misidentified the data series. Try again and ask for help if you need it.
27. Clean up the plot a bit and add a trend line: Right click on the chart area (to the left of the title for example) and select "font" and turn off the auto-scaling. Make sure the font size is 10 point. Add a trend line (right click on a data point to do this) and choose linear and "show equation".
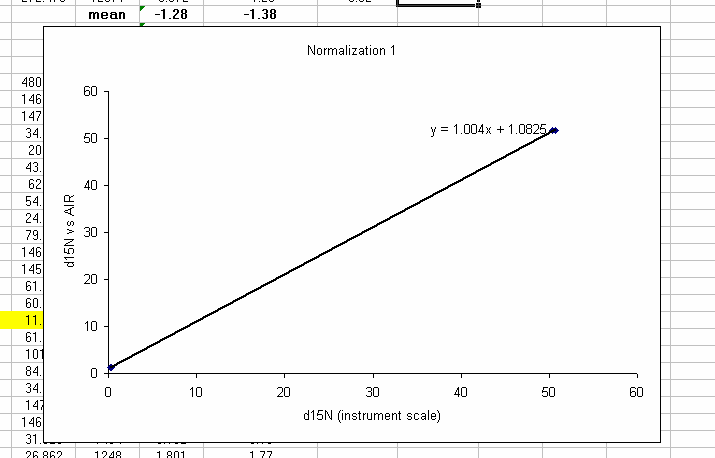
28. Shrink the plot, make sure that you have 5 significant figures in the equation (right click on the equation text box and choose format -> number -> 4 or 5 decimals as appropriate (or scientific with 4 decimals). Make the plot fairly small and place it as shown below. You will be stacking plots like this so smaller is easier to work with, you just need to see the equation well.
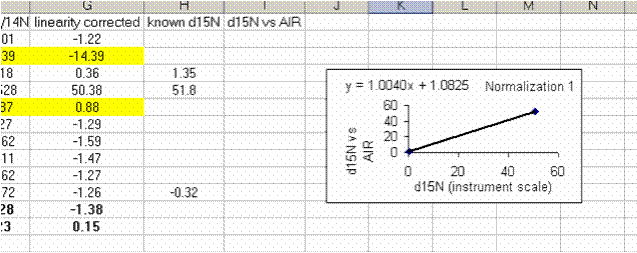
29. Use the normalization equation to convert all samples measured between the two sets of high/low standards to the international scale (AIR for nitrogen and VPDB for carbon):
Be sure to flag any problematic numbers such as those for samples with low intensities.
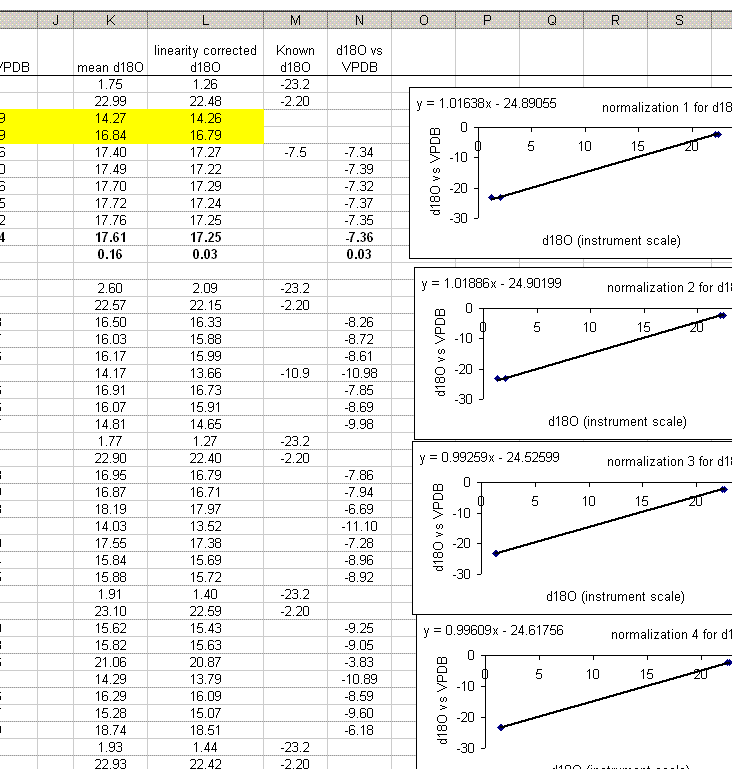
30. Calculate the mean and standard deviation for the linearity check standard. Copy the plot and paste it next to the next set of "sandwiched" samples. Right click on the plot and choose "source data". Now highlight the new set of data points for this section of samples:
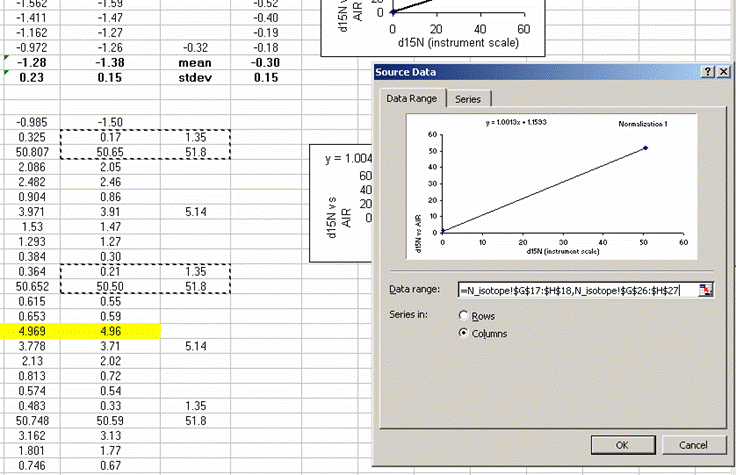
If this is done correctly, the equation will update and the slope and intercept of the new line should be very close to those in the previous plot. Rename this plot "normalization 2" and repeat for the entire data set:
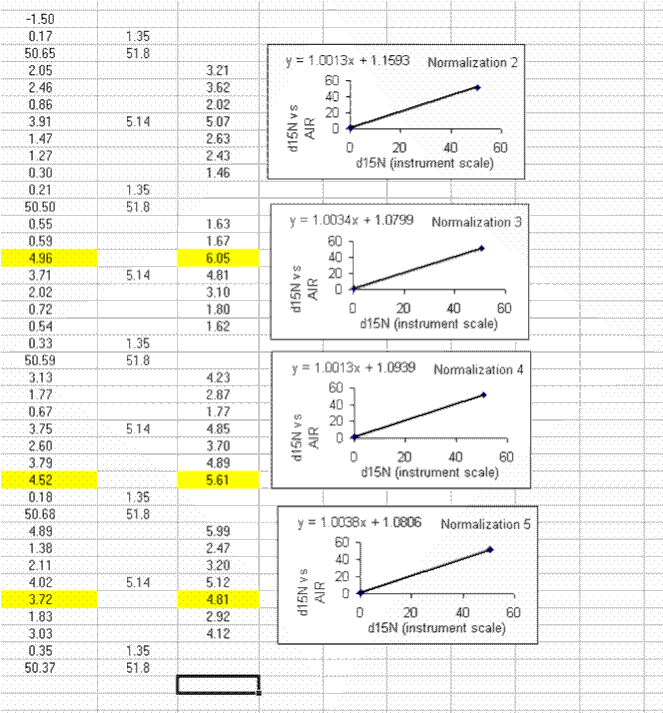
Be sure to flag any results which are known to be incorrect.
Repeat all of the steps above starting at step 6, but this time you are after the carbon results so remove the nitrogen numbers from the C_1 worksheet and go from there. Note that when you sort the results by retention time (Rt) you should choose "A to Z" so that the sample peaks show first and the reference gas peaks show later. Because we set the sensitivity for peak detection rather low, one will sometimes see peak tails integrated as well. You can tell these by their low amplitude (ampl 44) and their retention time which will be somewhere in between that of the major sample peak and that of the next reference gas peak. The example data set provided with this tutorial has the steps and results shown for Carbon. When you are done with Carbon, then move on to the next step below:
31. ...More to come soon....
δ2H and δ18O of waters by TC/EA
I. Changes made to setup
II. Memory effects
III. Injection problems
IV. Data processing
I. Changes made to setup
NOTE: This page needs to be updated when we get a little more time. For now, here is a brief summary of some of the changes we have made that are not listed further down in this page (posted to isogeochem list on Dec 1, 2006):
We now use an SGE 0.5uL syringe with a wide diameter (23 gauge I think) and conical tip and find that this syringe works much better than the Hamilton one. In addition to more reliable injections and fewer problems with seizing plungers, it is less expensive and has a syringe needle/plunger replacement kit that can be purchased for about $28. Only catch is that you need to replace septa a little more frequently due to the larger diameter needle. Injection volumes are 150nL.
All of the information listed below concerning memory effects were observed with the Hamilton syringe and may no longer be applicable with the SGE one.
We now use a postinjection delay of 15 seconds instead of the 8 seconds mentioned in the page.
Our glassy carbon tube does not have a narrow diameter hole on top so we cut a piece of graphite tubing that did have a narrow diameter hole (about 4mm diameter hole) and just set it on top of the glassy carbon tube.
We wrap the bottom fitting with about two to three layers of teflon tape to get the seal (just need to feel that it is snug in the glassy carbon tube).
We now have a 7mm I.D. glassy carbon tube and the peak shapes are a little more narrow. I need to throw a screen shot of a data file up there eventually.
We operate the TC/EA at 1400°C (no longer 1450°C) and the GC is at 90 to 110°C.
Below is the page that still needs to be updated...
II. Memory effects
Waters can by analyzed using the TC/EA (Thermo-Chemical Elemental Analyzer) at 1450°C. With our current method, samples are placed into small vials. For small sample sizes it is recommended to use vials with 150mL inserts. These are good for sample sizes down to 50mL or less. For these very small sample sizes it is highly recommended that the user perform a series of tests in advance to make sure that their sample transfer and storage techniques do not adversely effect the isotope ratio of their samples. Please consult with us for this if you have any questions.
There are several issues that arise with the use of a single syringe to inject a variety of samples via a septum into the TC/EA. Most notable is that of sample memory: ie. some remnant of the previously injected sample remains somewhere in the system and biases the measurement for the next few injections. The best way to see such effects and their duration is to perform a series of injections of standards that have extremely different isotope ratios. If the memory effects from standards with extreme values can be nullified, then it stands to reason that such problems will also be negated with real samples.
Here is an illustration of sample memory:
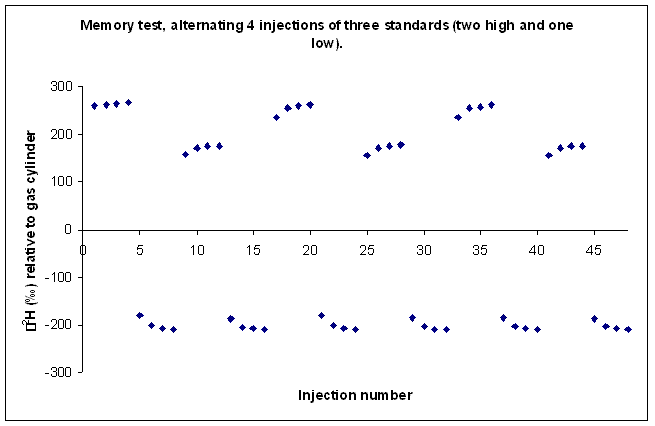
We tried varying the method used to prime and clean the syringe but to no avail. This memory effect even remained after flushing the syringe with relatively large volumes of the next sample. We finally concluded that the memory effect that we are seeing is coming from the injection port septum. Our solution was to perform three 180 nL injections of the sample in rapid succession into the TC/EA, after waiting sufficient time for the resulting analysis gases to elute from the system we perform four analyses of the sample or standard. Ideally this gives up 4 measurements which we can average. Until recently, we were experiencing many "failed" injections (perhaps 10-20%) which could not be used. The precision of the measurement for samples is not given as the precision of these injections, instead we report the standard deviation of the mean value measured for some laboratory standards which were run in replicates throughout the sequence.
Here is an example of the file obtained with the three rapid injections to clear the sample memory:

This is the result of our solution on sample memory. There is one single measurement that came out notably poor. It is the first run of the third sample (ie. the 9th point in the plot). Can you see it?
for hydrogen:
for oxygen:
III. Injection Problems
Here is an example of a very nice injection of 300nL of water:

Conditions for the above data are:
TC/EA furnace at 1450°C
GC at 80°C
Carrier gas flow = 100mL/min (measured at the exit from the GC)
GC column = 5A packed column, 1/4" O.D. by about 50cm.
no dilution on the conflo
injection volume = 300nL (using a 10uL syringe holder on the PAL equipped with a 1.2uL syringe. Set PAL to inject 2.5uL, this results in 2.5/10 * 1.2uL = 0.3uL)
Air volume = 0
No solvent precleaning
Sample precleaning = 2
fill speed = 5.0uL/s
fill strokes = 6
pullup delay = 500ms
preinjection delay = 0ms
postinjection delay = 8 sec (note, we found that a long postinjection delay is necessary to allow time for water to come off of the syringe needle. A short delay more frequently resulted in significant peak tailing.)
injection speed = 5uL/s (note: slowing down the injection rate from the default of 50uL/s to this value has dramatically improved the quality of the injection)
postclean solvent = 2 (note that our solvent bottle is empty, this is just an attempt to dry the syringe a little bit)
Although each run is only 5 minutes, a sequence list will be very long to allow for the multiple sample injections as well as the "memory clearing" of the first rapid injections. Here is a template sequence list for our current setup. It is very long. The user should replace the items labelled spl1, spl2, etc. on the left side of the window with their real sample names. This will update the sequence template in the columns to the right. A full tray of 98 samples currently takes up 760 lines in the sequence. When we find more time to improve our injection technique we hope to reduce the number of replicate injections to 3 per sample and also get rid of the memory clearing step.

The above injection was fairly common when using a short postinjection delay.

This is probably the most common "poor" injection we have seen. It is easy to find these in the exported results due to the unusually high amplitude of the m/z 2 peak. With these injections, even though the CO peak doesn't look so bad, the measured δ18O is usually far from what is measured with good injections. After changing the pre-injection delay from 500ms to 0ms and the injection speed from 50uL/s to 5uL/s these poor injections have disappeared.

This injection was less common and appears to also have been a result of a short post-injection delay.
Precision and Accuracy
Since we finally figured out how to get the nice, reproducible injections (Aug 9, 2006) we are getting very good precision and accuracy. The section below on data processing will show how we achieve these results. In brief, our first data set showed the following results. Note that errors reported are 2σ.

All results above are given on the VSMOW scale. Our water working standards were first calibrated against SMOW/SLAP last year. The outstanding quality of these numbers came as a surprise to us. However, even though our standards look great it is necessary to ask about data quality for samples. These standards are bottled waters (and antarctic water). They will experience minimal matrix effects and so it is still necessary to perform replicates of individual samples in order to get an appreciation for the precision of the numbers for samples. Ideally, we'd also have check standards that have matrices similar to those of the standards. That is not the case yet, but we are hoping to make some in the future.
Here is the data that led to the results posted in the table above. This data is part of a set. The entire data set will be posted on the week of Aug 14th after it has all finished running. At that point we will be able to check the variation of replicates of samples as well as of more check standards. UPDATE THIS
A comment on statistics: The numbers given above are means and standard deviations of three measurements taken at approximately 8 hour intervals. However, it should be recalled that each measurement in our data is itself the mean of four injections at one given time. So, technically, we are actually showing the standard deviation of the means of three measurements, ie. the standard error.
Here is another way to look at the numbers above:

IV. Setting it up
The hardware setup: What you need to do this
You need a TC/EA or similar device that is capable of converting water to H2 and/or CO. We use a PAL autosampler by CTC Analytics with a 10uL syringe holder and a 1.2uL syringe (sold by Hamilton specifically for the PAL). We use 2mL vials either filled with minimal headspace or equipped with 150uL inserts (for small sample sizes).
Thermo Electron sells a "liquid injection kit" for ~$2500. This includes a liquid injection port adapter for the top of the TC/EA, a graphite tube with a narrow top to place on top of the existing glassy carbon tube, a couple of septa (not very good ones), the 1.2uL syringe and maybe one or two other small items. We initially used this setup and obtained very good precision for hydrogen (< 1.5‰) but had inconclusive results for oxygen as our small CO tank ran out and it took three months to get a replacement one what was around natural abundance. As a side note, the "research grade" CO sold by Air Liquide has a δ18O and δ13C of about -5 to -10‰ vs VSMOW and VPDB respectively.
An alternative setup using a sort of "wrap around" helium flow discussed in the literature (Gehre et al. Rapid Commun Mass Spectrom., 2004, 18, 2650-2660) reported very good precision for both δ2H (< 0.5‰) and δ18O (< 0.1‰). With funding from John Sabo's group, here at ASU, we purchased the required bottom feed adapter and glassy carbon tube from IVA Analytical, in Germany. One thing that this kit didn't come with was a narrow-topped tube, as described in the literature. We had to take our narrow-topped graphite tube that came with the initial Thermo liquid injection kit and cut it to fit on top of the glassy carbon tube. If one does not do this then peak shapes end up very poor due to the large dead volume at the top of the reactor.
More to come... if you have any questions about this please contact the lab manager.
The software setup
We program the PAL autosampler with one method for the "memory clearing" part (internal no 8 in the sequence screenshot below) and one for a typical sample run (internal no 7 in the sequence screenshot below). In the memory clearing part, the only non-zero method parameters are:
sample volume = 1.5uL (with our 1.2uL syringe this translates to a 180 nL volume)
pullup delay = 500 ms
injection speed = 5 uL/s
postinjection delay = 6 s
The rest is set to zero
The sample run PAL method parameters are given further up in this page.
Here are some screen shots showing the time events for the isodat methods for the sample runs or the memory clearing. Also there is one screen shot of an active sequence. Note that we run 24 hours' worth of a sequence and then perform a new H3 factor measurement. In the future we may not need to do this as the sequence setup (sandwiching samples between bracketing standards) will cancel out any slowly drifting H3 factor.

Here is an active sequence list. Line 400 of the sequence is about 24 hours after the start of this section of the list (we hope to improve throughput later on). Note that the active sequence starts and ends with bracketing standards.

Here is the timing events for the quick succession of sample injections meant to clear any sample memory. Note that the 30 delay in between each injection gives the PAL enough time to go back to its home position. Also, the 290 second end time was selected so that we were sure the CO had completely eluted from the column before proceeding to the next line in the sequence.

Here is what the time events look like for a normal sample analysis. The autosampler takes a while to do the precleaning so we trigger it right at the beginning of the run.
V. Data Processing
Probably the most important thing to know about a reported number is how it was obtained. There are many steps in the processing of stable isotope data into final results. It is best to make minimal manipulations of the data and to be explicit. If one is dropping values for some reason, then that reason should be stated. An example (with real data) of how we currently process results from the TC/EA is given here.
Download this file in order to better see what is being done in the tutorial below.
1. Reprocess the data using the "H_and_O" export template.
2. With all data processing, the first thing to do is to copy the raw data into a second worksheet. Call the new worksheet "H_1".
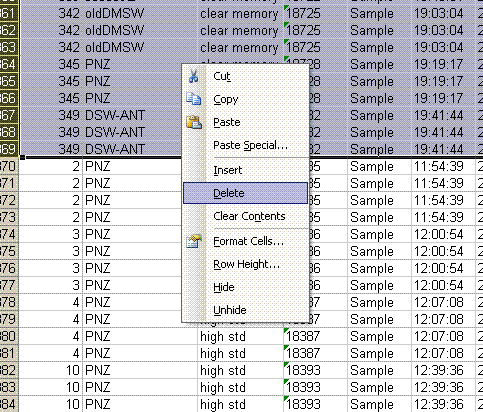
3. In the new worksheet, highlight the "identifier 2" column then go to Data > sort and say ok to expand to all data. Select sort by "identifier 2" and delete all of the data with the identifier "clear memory".
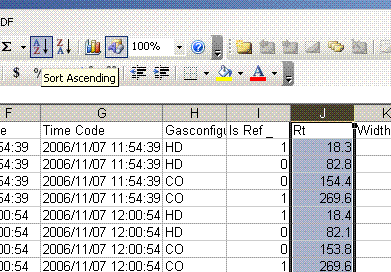
4. highlight the "Rt" column (retention time) and choose "A to Z" sort option. This will separate the hydrogen data from the CO data. We will process results for each isotope separately.
5. Copy the current worksheet to a new one called "O_1". In this new worksheet, delete all of the lines with results for hydrogen isotopes (line 2 to somewhere in the middle). In this same worksheet, delete the two empty columns for hydrogen results.
6. Now go back to the H_1 worksheet and delete the rows of data corresponding to oxygen isotope data. Delete the columns related to oxygen isotopes. Your final product should look like this:
7. Highlight the "Rt" column again and select the "Z to A" sort button. This will put the reference gas peaks at the end of the page. Find the line where the results for the reference gas peaks occur and insert 5 lines to separate them from the sample data. (Hint: the ref gas peaks all have a δ2H of 0).
8. Add a header in the leftmost cell above the ref gas peaks that says "ref gas peaks". Now copy this worksheet into a new one and name it "H_2".
This shows the new worksheet:
9. In the "H_2" worksheet, delete all of the reference gas peak data. Also, sort the data by line number and delete the extraneous columns so that the final product looks like this:
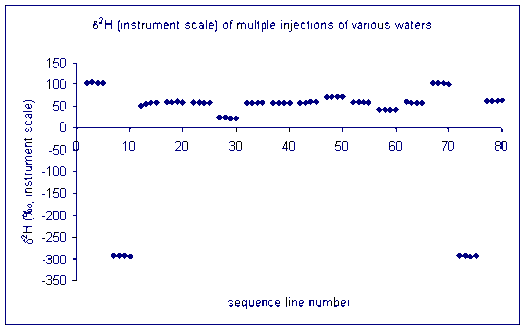
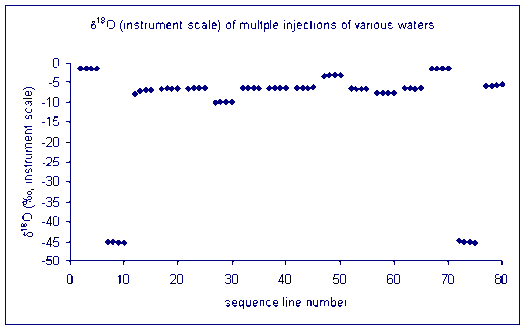
10. One very important factor in ensuring data quality with this method is the injection. To test the reproducibility of the injection we plot peak amplitude, peak area, peak width, and retention time as a function of the line number in the sequence. In particular we are looking for any misidentified peak tails, or spikes or dips. Here is what you should have on the screen when done:
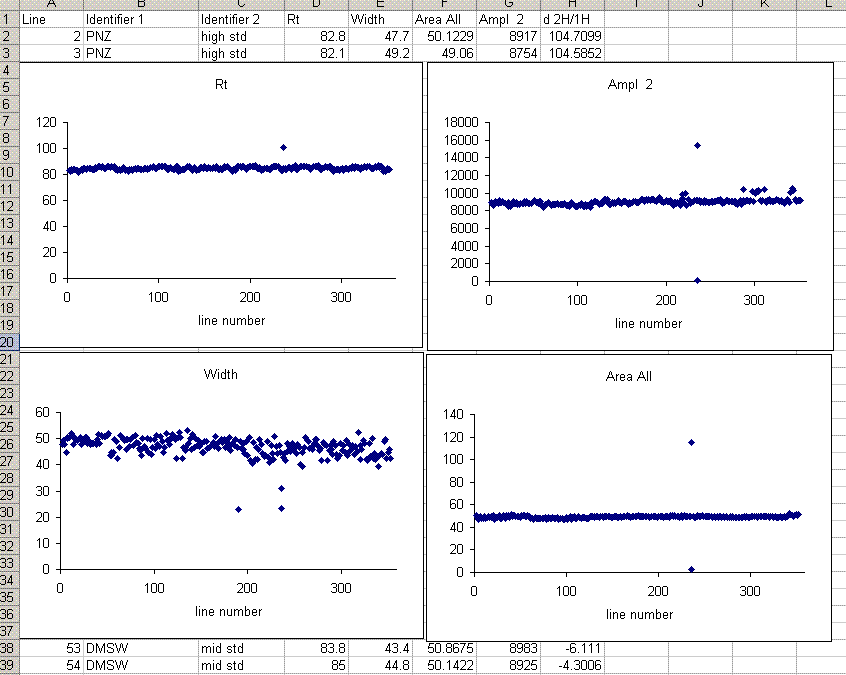
In the plots above one can see that there is a single data point with a retention time around 100 seconds, whereas the rest are around 85 seconds. Similarly, there is a single peak with an ampl 2 that is well above the norm and another with a very low amplitude. The peak width plot also shows three points which stand out. Place the cursor over the odd point and you will see the sequence line and value for that point:
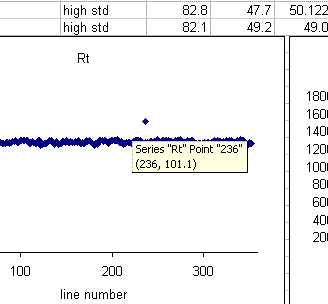
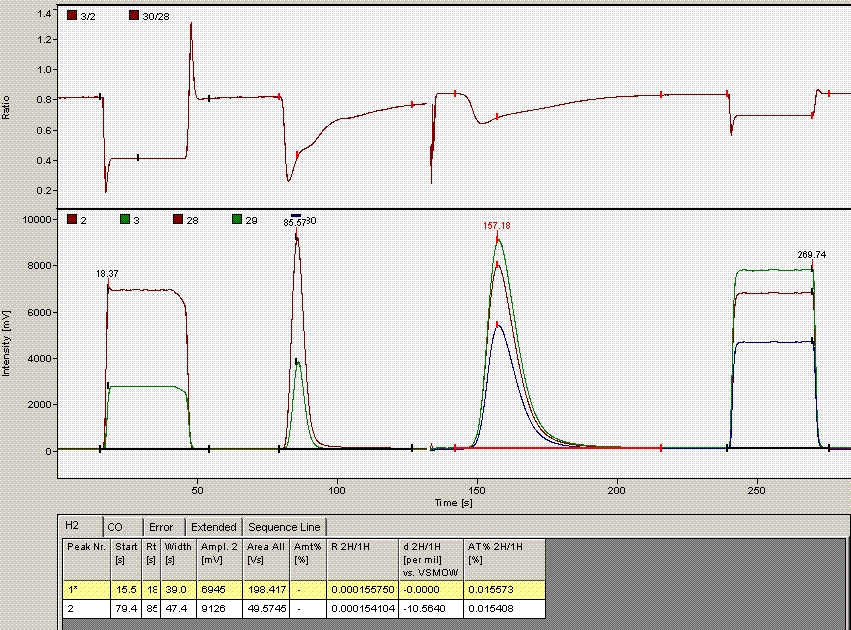
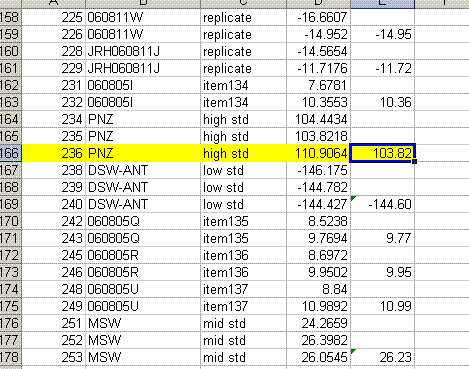
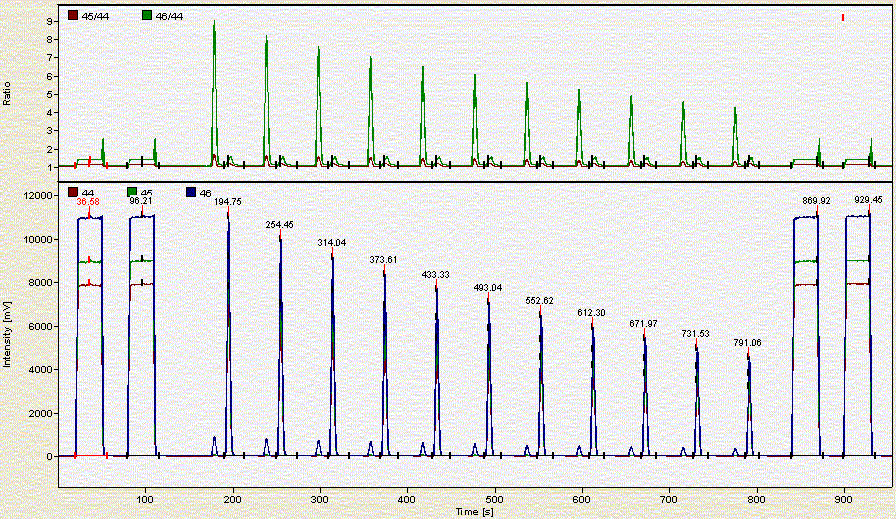
When checking each plot in this data set, we see the high retention time for line 236, low peak width for lines 190, 236, and 236 (yes, there are two points for line 236: that suggests a peak tail was misidentified), high/low peak amplitude and area for line 236 and 236. Again two points for the same sequence line. This pretty much confirms a split peak and the very high amplitude suggests a messed up injection. Here is what the chromatogram looks like for sequence line 236:
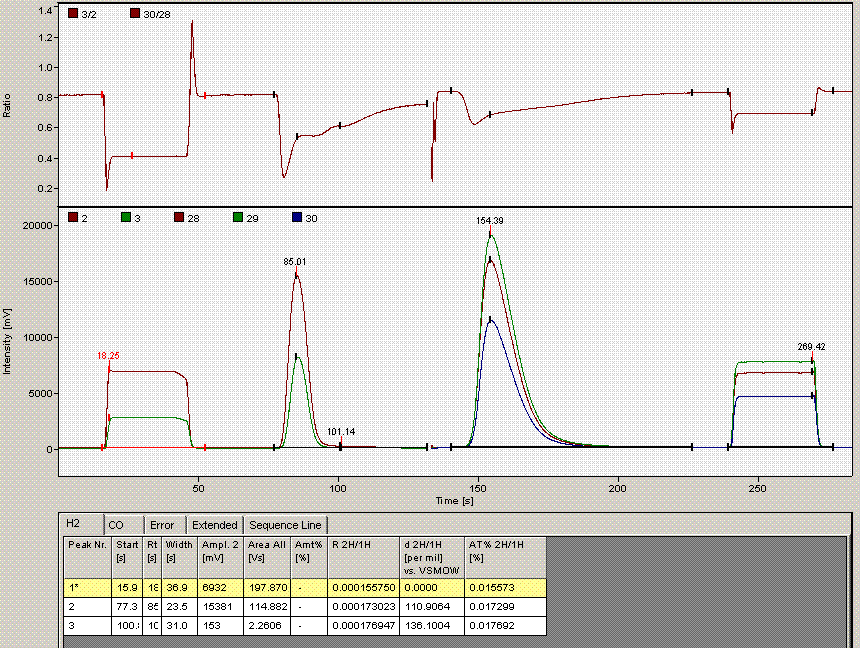
One can see from the chromatogram that the tail of the hydrogen peak has been integrated as well, hence the extra hydrogen peak in the plots. Although there is nothing clearly wrong with the peak shapes here, for consistency we will not include results from this data file as the injection was clearly of a much larger volume than for the rest of the analysis. Here is what the injection at line 235 looked like (note that it is the same water sample):
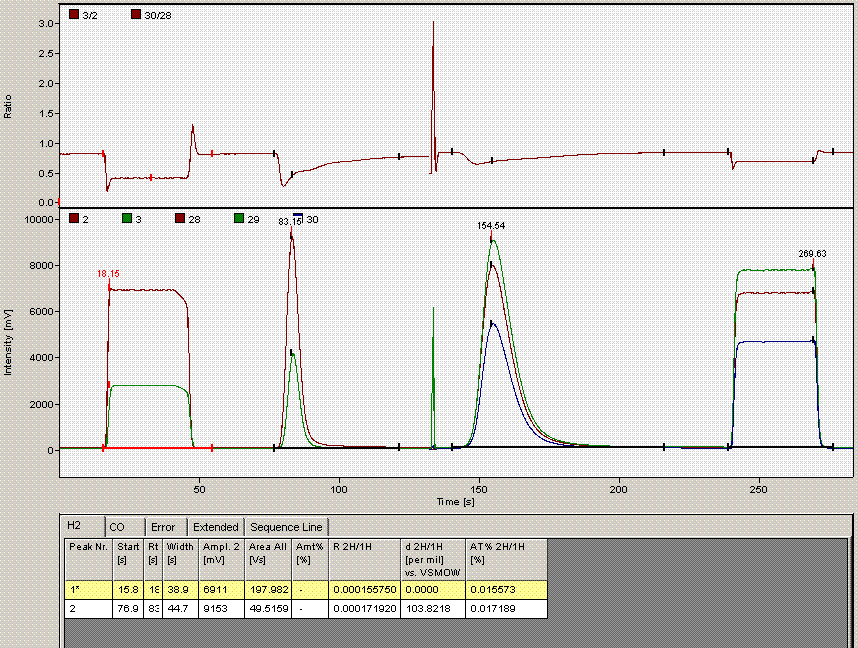
Above is the injection just prior to the "odd" one at line 236. The peaks are a little more narrow, and in particular, the hydrogen isotope ratio differs by about 10‰ from the value at line 236.
Now that we have dealt with the oddity at line 236, we can go and take a look at the data file for line 190, which gave rise to an unusually short peak width. Here is what the chromatogram looks like:
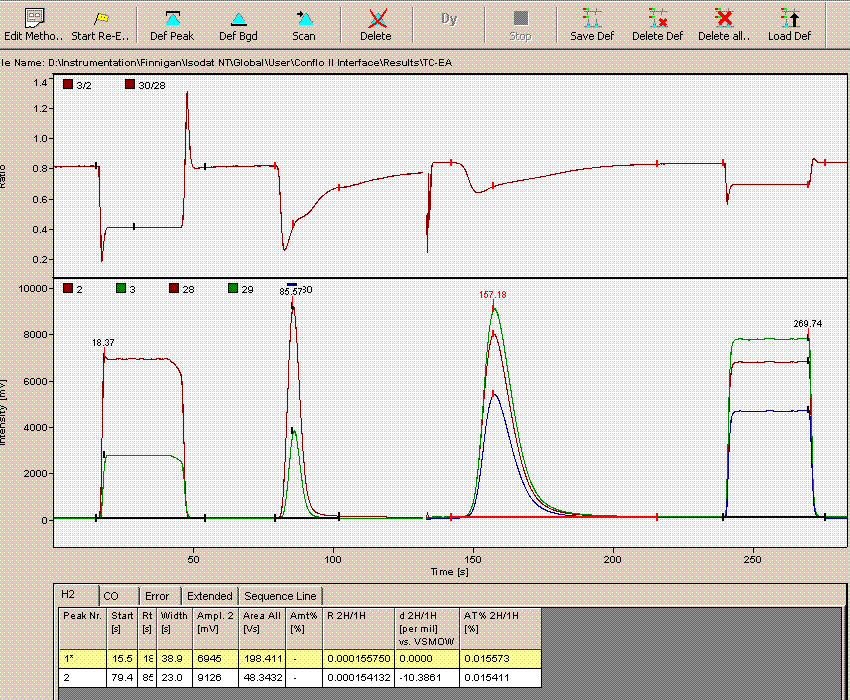
Comparing this data file to the one just above it makes clear that the integration has premuturely identified the peak end a little early. In general, this variation has only a small effect on the final value, however, we can modify the method file to get a more consistent peak width if we want: Click on the "edit method" button (seen in upper left corner of the above image) and go to the "peak detect at H2" tab. Change the peak end slope from the default value of 0.4 mV/sec to 0.05mV/sec as seen below:
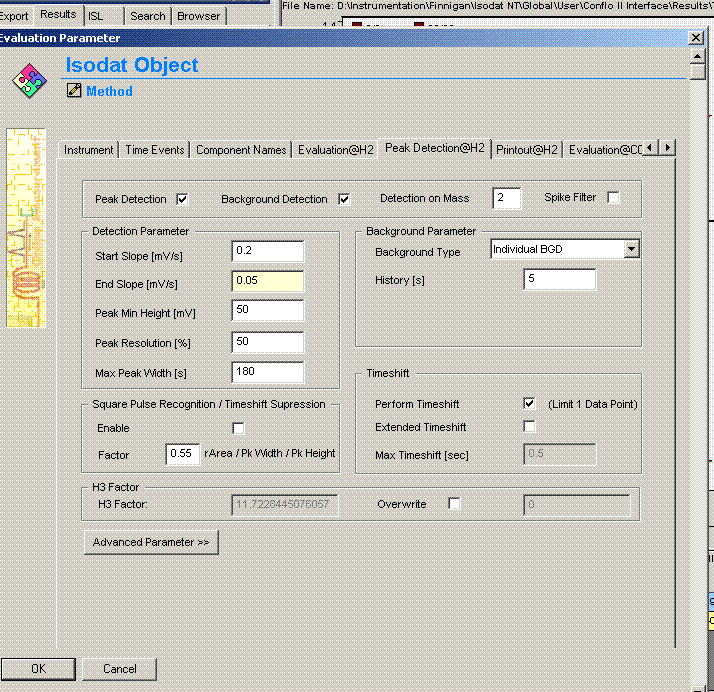
Click on "ok". Then click on the "reevaluate data" button that is located right next to the "edit method" button. Here is the result:
The peak width is now 39 seconds, which matches well with all other results in this sequence. The d2H measured here has changed from -10.39 in the earlier image to -10.56 here. That amount is not particularly significant for hydrogen isotopes, however, for consistency we should incorporate this value in the spreadsheet.
11. Copy the current results into a new worksheet and call it "H_3". Delete the plots in this new worksheet and go flag any results which should not be used. In the case of this data file delete the line corresponding to the peak tail for sequence line 236 and flag the d2H for the unusually large peak in line 236 in yellow.
Also, find the hydrogen isotope ratio for sequence line 190 and change the δ2H to -10.564‰. Flag this value with a different color and put a comment in the cell next to it explaining why it is flagged:

12. Delete the extraneous columns so that the final product looks like this:
As can be seen in the data above, there is still some memory effect between samples. It is most notable between the PNZ and DSW-ANT working standards, which span a wide range of isotope ratios. In processing the data we will only use results acquired after the first injection. For the working standards that means that we'll use the mean of the second and third injection. Since we are only performing two injections per sample in this data set, we'll only be using the value of the second injection. As we have replicate analyses incorporated into the sequence, we will still have a good estimate of the analytical uncertainty of the measurements.
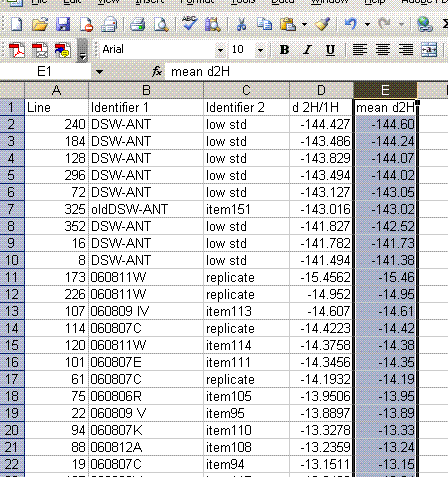
13. Label column E as "Mean d2H" and calculate the mean value for the set of injections after the first one for the standards and samples. Be sure not to include the flagged value for line 236.
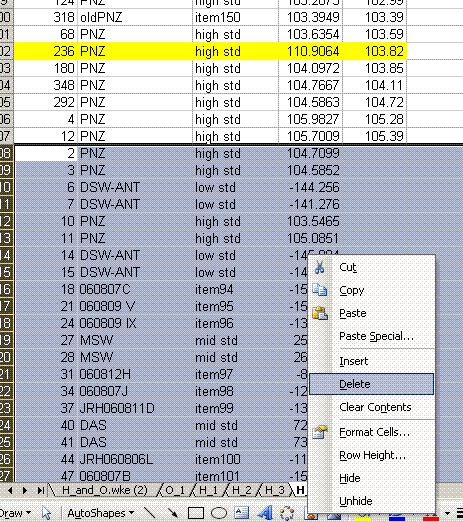
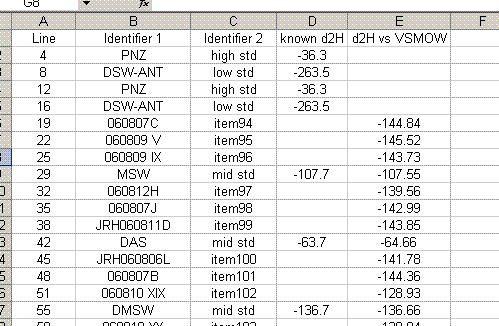
14. Copy this worksheet into "H_4". Highlight all of the data (easiest way is to click on the empty box above the row numbers and to the left of the column letters). Now click on "paste special" > "values". Sort the data by the mean d2H:
15. Delete the data that does not have a "mean d2H" value. Delete the column headed as d2H/1H and sort the data by line number.
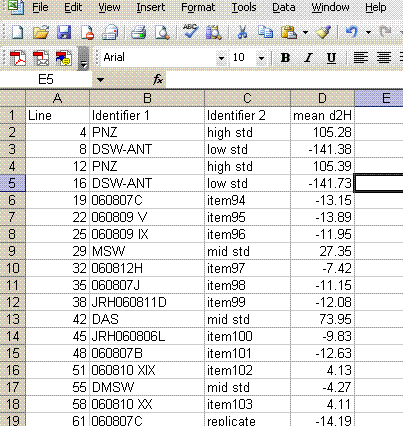
16. Add a column header saying "known d2H" and another saying "d2H vs VSMOW". In the "known d2H" column, put the known values for the working standards (found here): (LINK IS CURRENTLY BROKEN, might be because this page is not linked will test later)
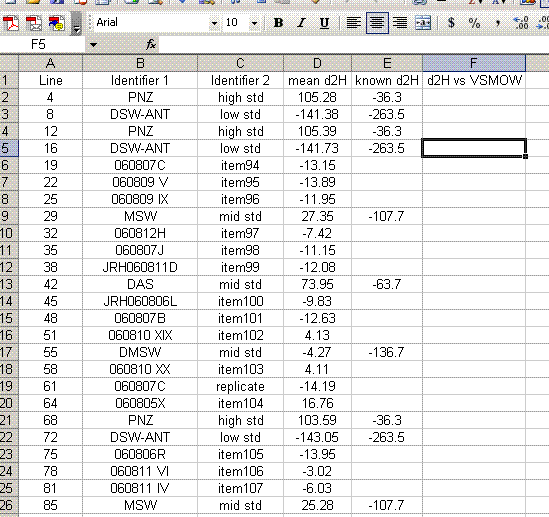
17. Plot the "known d2H" values as a function of the "mean d2H" values for the bracketing standards (the PNZ and DSW-ANT in this case). Be sure to sandwich the data: see which data are highlighted in the screenshot below. For the plot, choose "xy scatter" and be sure that under the "data range" option (step 2 of 4) the "columns" box is checked. Use the title and axes labels shown in the image below. Also, be sure to remove the gridlines and legend.
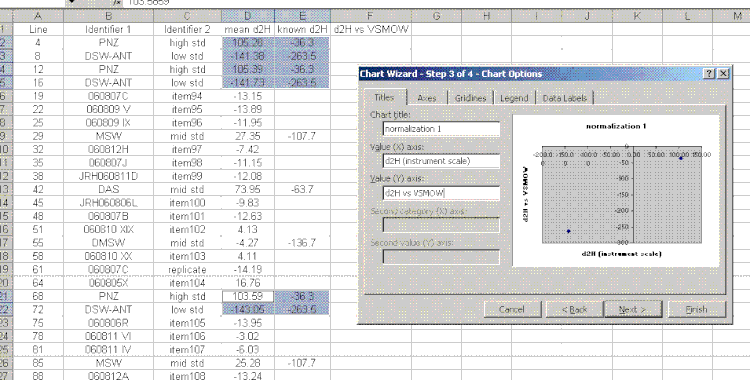
18. In the final plot, right click on a data point and choose "add trendline". In the trendline options choose "show equation". I would also recommend right clicking in the area between the plot and the border and choosing "edit chart area", then go to the font option and turn of the auto-scale. Shrink the plot and move it to the side.
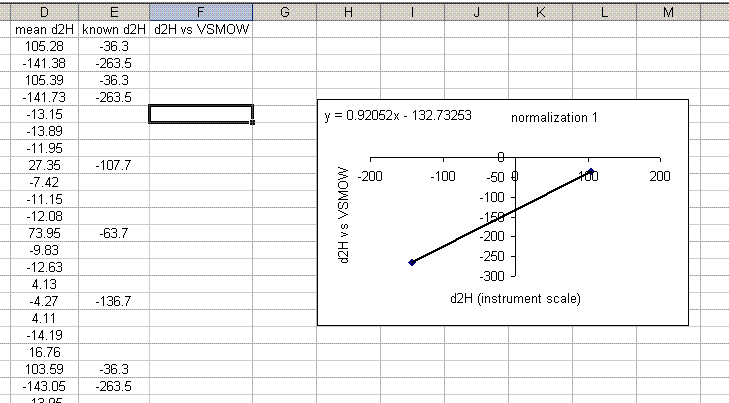
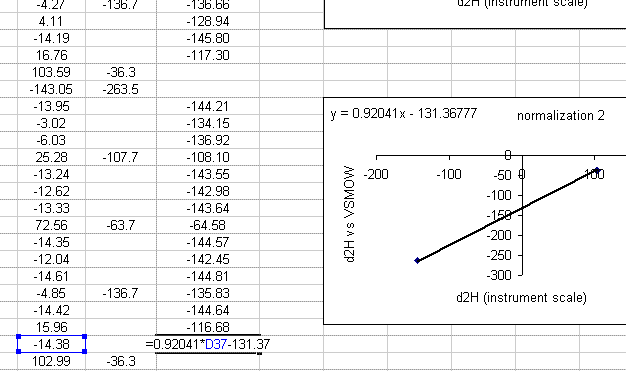
19. Use the equation from the normalization plot to calculate the hydrogen isotope ratios for the samples and check standards:
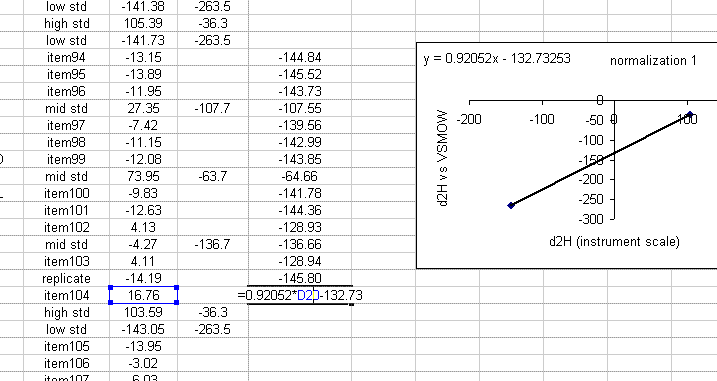
20. Copy the normalization plot and paste it between the next set of bracketing standards. Change the title to normalization 2. Right click on the plot area and select "source data". Highlight the new set of data to use for the normalization:
note: that the screen capture option missed the outline that excel makes on the highlighted source data so I added the boxes to highlight them in the image above.
21. Use the new equation to calculate the hydrogen isotope ratios for samples in this section of the sequence.
22. Repeat this process for all of the data. After that, copy this worksheet into another one called "H_results". In the new worksheet, highlight everything, select "copy" then select "paste special" > "values". Delete all of the plots as well as the column labeled "mean d2H".
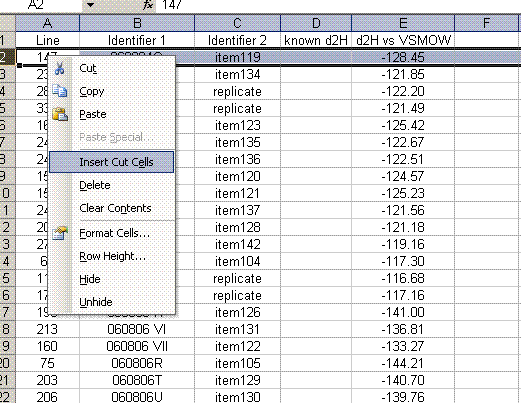
23. Sort the data by identifier 1. We want to place all of the results for standards on top of the sheet, and results for samples further down. To do this, cut the rows containing sample data and choose "insert cut cells" to paste it at the top of the sheet:
24. Delete the rows corresponding to the bracketing standards (they should have no value for "d2H vs VSMOW"). Organize the data as shown below. Also, calculate the mean and standard deviation for the replicates of the standards.
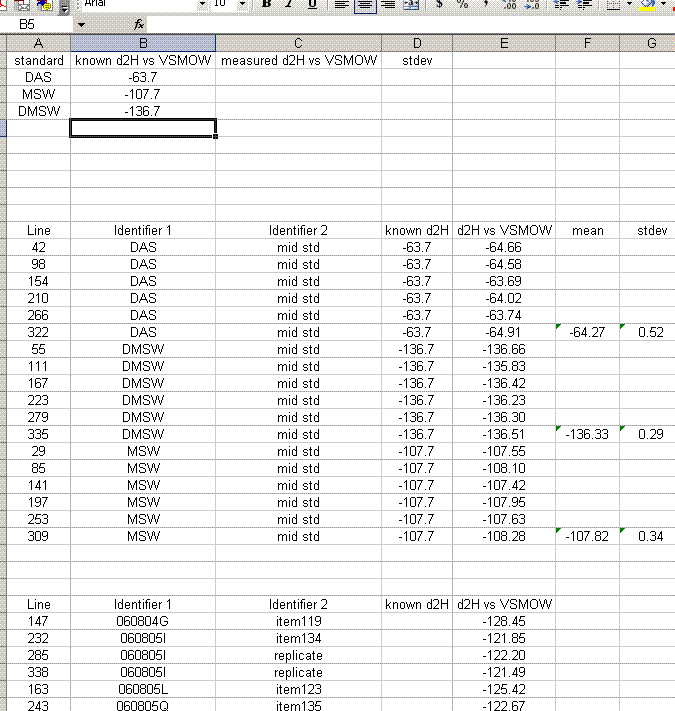
25. Copy the values for the means and standard deviations for the working standards into the top table. Note: don't just copy or drag the formula over to the cell because of the next step: Delete the rows with the detailed results from the working standards so that your sheet looks like this:

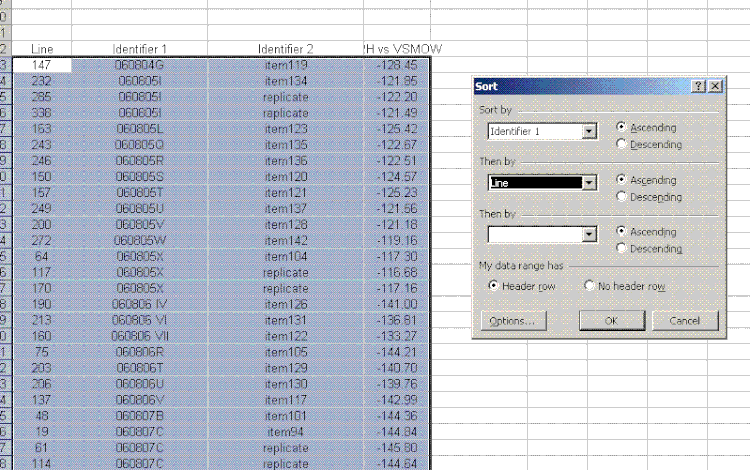
26. For the sample results, delete the section called "known d2H". Then sort the results for the samples by identifier 1. To do this, highlight just the data for the samples and go to "Data" > "Sort". Choose "identifier 1" and then in the second category choose "line":
27. Sample that were run in triplicate in the sequence will have the word "replicate" in the "identifier 2" column. Calculate the mean and standard deviation for these items (Note triplicate runs will all have the same "identifier 1"). Add a section between the standards and samples in which you list the replicates and their associated standard deviations.
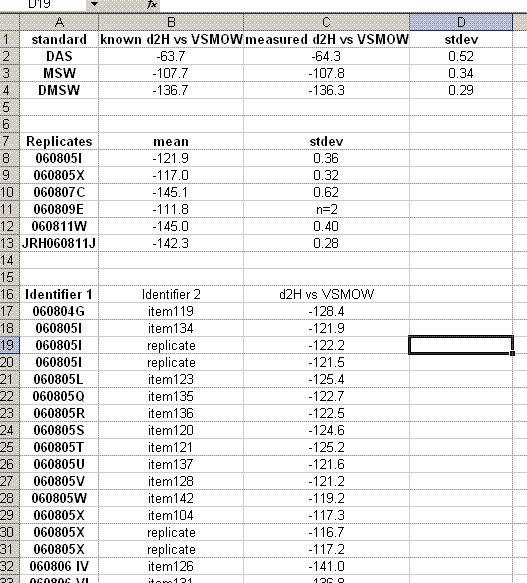
Analytical uncertainty for the replicate samples can be reported as the standard deviation of those replicate measurements. For the rest of the samples one should use the mean of the standard deviations of the replicates as the estimated uncertainty.
The DAS, MSW, and DMSW check standards serve to demonstrate the overall quality of the laboratory equipment and measurement. Ideally, these standards would be closely matched to the sample matrix. In general, the measured values should be within 2 standard deviations of the known value, however, unusually good precision does sometimes occur so if they are within 2σ of the known value (assumes a stdev of 1σ) then we will be happy with that result.
28. The same sort of data processing can be done with the oxygen isotopes.
δ2H and δ18O of waters by equilibration
(Note that we currently use the TC/EA method for waters but this equilibration method is available for specific needs)
δ18O of water:
The analyst places 0.5mL of water into a 12mL exetainer vial. The vial is flushed with a blend of 0.5% CO2 in He for 15 minutes. This is then allowed to equilibrate on a heating block at 25.0°C for greater than 20 hours. Two equilibrium reactions are occuring here:
CO2(g) ↔ CO2(aq)
(CO2 is exchanged between the gaseous and aqueous phase)
CO2(aq) + H2O ↔ H2CO3 (dissolved CO2 reacts with water to form carbonic acid)
It takes about 20 hours at 25.0°C for the isotope exchange between gaseous CO2 and water to reach equilibrium. Some literature indicates that this equilibrium time can be dramatically decreased by using an ultrasonic bath. We may experiment with this in the future.
Samples are run once (unless otherwise requested) along with 6 replicates of 3 different standards. Two of the standards used should bracket the isotope ratio of the samples and the third standard is used as a check of the normalization. Although there is isotopic fractionation between gaseous CO2 and dissolved CO2, as well as between dissolved CO2 and H2CO3, this same fractionation occurs to the same extent with all of the samples and standards. Hence, by normalizing the results with respect to the working standards, fractionation associated with these phase changes and reactions cancels out in the calculations.
The standard deviation reported for the samples is the mean of the standard deviation of the results for the standards.
It should also be noted that carbonic acid has a pKa of 6.4 and consequently in alkaline conditions it will dissociate to form bicarbonate:
H2CO3+ OH- ↔ HCO3- + H2O
As a result of this, water samples with a relatively high pH will remove more of the CO2 from the headspace, making it is necessary to verify that there is still enough CO2 gas to get a good signal for the analysis.
This file gives a step by step account of how do process the results from a full sequence of samples. This is an example of the results we get for δ18O of waters and how we process them.
δ2H of water:
The analyst places 0.3mL of water into a 12mL exetainer vial. The vial is flushed with a blend of 2% H2 in He for 15 minutes. This is then allowed to equilibrate on a heating block at 25.0°C for greater than 4 hours. A Pt catalyst is added (a plastic rod with a Pt dust coating on it, called a Hokku bead). Gaseous H2 adsorbs onto the Pt surface and dissociates and reassociates. Water vapor does the same. Isotopic equilibrium between H2 and H2O occurs within about one to two hours, however, we allow a minimum of 4 hours so that no doubt can be cast on whether or not equilibrium had been reached.
As is the case with δ18O analysis, a minimum of 6 replicates of 3 different standards is run along with the individual samples. Two of the standards are chosen to bracket the samples and the third standard is used as a check of the quality of the normalization curve.
The standard deviation reported for the samples is the mean of the standard deviation of the results for the standards.
δ13C and δ18O of Carbonates
I. Overview
II. Standards
III. Isodat setup
IV. Some method variables investigated
V. Data processing
I. Overview
We use the multiprep heating block and the gasbench to measure δ13C and δ18O of carbonates. In brief, here is the setup:
Aliquots of samples and working standards are weighed onto either small sheets of weighing paper or into tin capsules (used for the EA) and are then poured into 12 mL borosilicate Labco Exetainer vials (the ones with the round bottoms).
Vials are flushed on the multiprep unit with helium at 100mL/min for 8 minutes at 70°C. Note that the sample vials get pressurized from this process.
Pure phosphoric acid is added manually (amount of acid is generally about 10-15 drops) to each vial. Note that we mark the caps of vials to indicate where the acid injection was made. This helps to ensure that the sample needle does not aspirate phosphoric acid into the gasbench during analysis.
Vials are allowed to equilibrate for a predetermined amount of time at 70°C. Currently, we equilibrate pure calcites for 1 hour. Bone and enamel are given 6 hours to equilibrate at this temperature.
Vials are then sampled with the gasbench. We make 11 sample injections (see more on the isodat method below) and retain all peaks that elute after 400 seconds. We have noticed that in general the data quality of the first peaks from the sample are not as stable as for the rest.
Results are exported to a spreadsheet. If standards show no sign of drift then a single normalization is performed on the entire data set.
Final isotope ratios are reported with respect to VPDB.
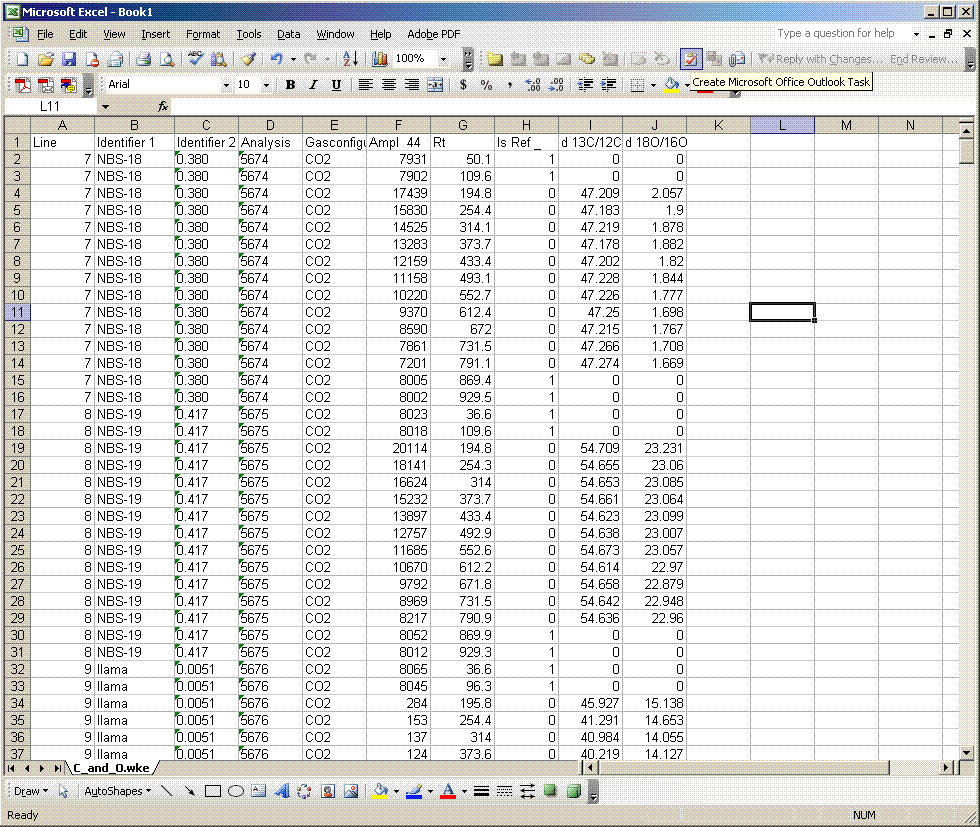
Here is what a chromatogram looks like for about 2 mg of a bone sample:
Here is a chromatogram for about 0.350 mg of NBS-18:
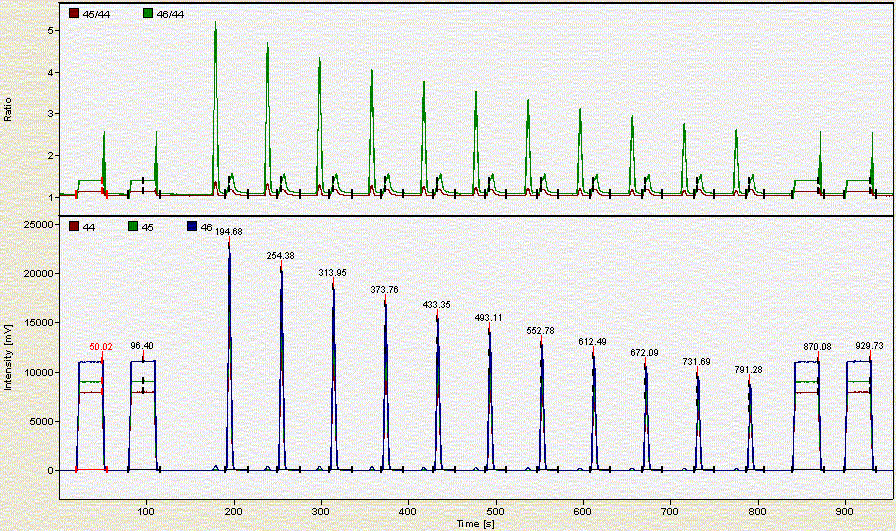
As the headspace is flushed the concentration of CO2 in the vial decreases. Hence each additional peak is smaller than the preceding one.
II. Standards
We still have not completed the preparation of a variety of laboratory working standards, so we do use NBS-18 and NBS-19 at this time. They will be phased out in favor of larger batches of laboratory working standards when we finish preparing them. Here are the standards that we currently use:

III. Isodat Setup
We have the gasbench set up with the helium pressure at 15 psi. In addition, the helium tank delivery pressure is set to 40 psi so as to maintain a 100 mL/min flow rate at the flush lines. The helium flush is performed with dual flush needles (flush two vials at a time) for 8 minutes.
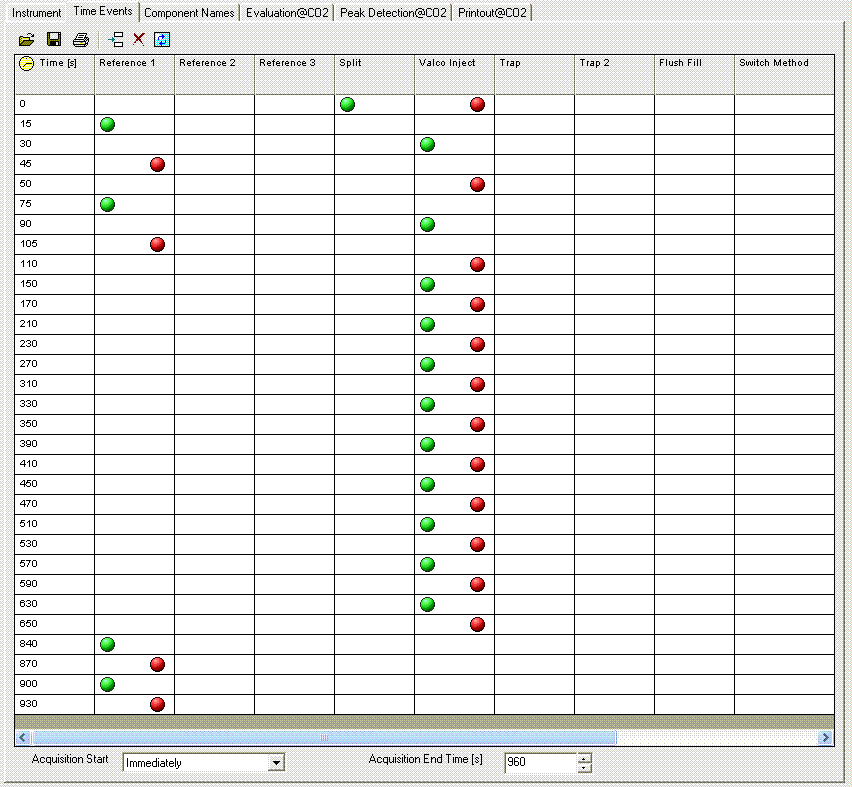
Here is what the time events look like for the method we use:
At the moment we have not developed a suite of laboratory working standards. We have one bone standard and one marble standard as well as NBS-18 and NBS-19, which we use for our analyses. We are working on obtaining two more carbonate working standards that span a reasonably wide range. Additionally, we are ordering the IAEA standard LSVEC as it has a fairly low certified value for δ13C, which we need to bracket bone and enamel samples. We also prepare a linearity check with one of our working standards. Below is an example of a sample sequence we use:
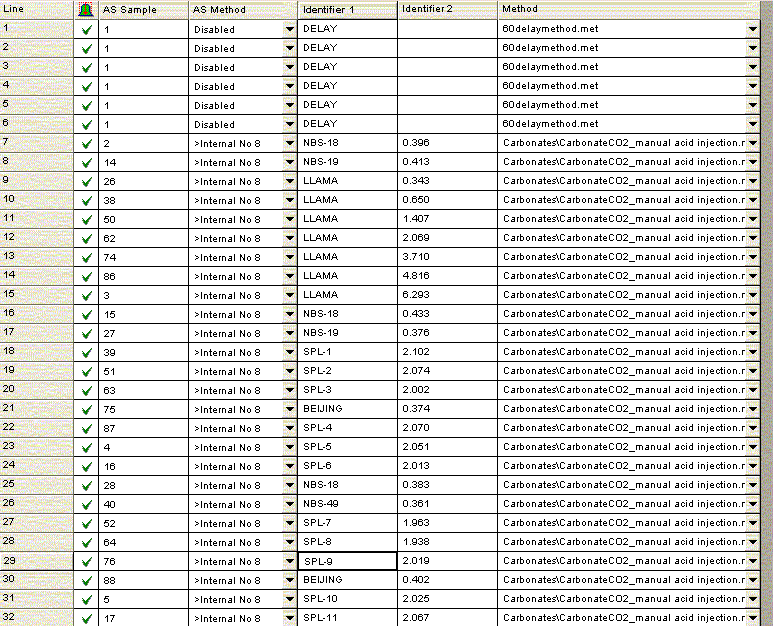
For bone samples, we have found that a 6 hour reaction time is needed to ensure complete reaction/equilibration with the phosphoric acid. The beginning of the above sequence simply runs six one-hour delays prior to starting sample analysis. The sequence starts and ends with NBS-18 and NBS-19, and intersperses them occasionally to compensate for minor instrument drift. In addition, the llama leg bone standard is prepared with a variety of sample sizes to measure (and correct for) any linearity effect on the instrument. The Beijing standard is a marble standard that is run as a laboratory check. If any drift corrections are needed (rare) then we can evaluate their effect on this standard. The autosampler position number goes along columns in the multiprep unit because we initially set this method up to use an automated acid pump. However, the finer diameter line of the acid pump easily plugs at our laboratory temperature (22°C). We would like to try to make the acid pump work for us, but it has been a low priority task. We are also very aware of the fact that many labs with talented staff have given up on the acid pump in favor of a manual acid addition so that has also discouraged us from spending much time on this problem. The manual acid addition works fine and is pretty easy.
IV. Variables
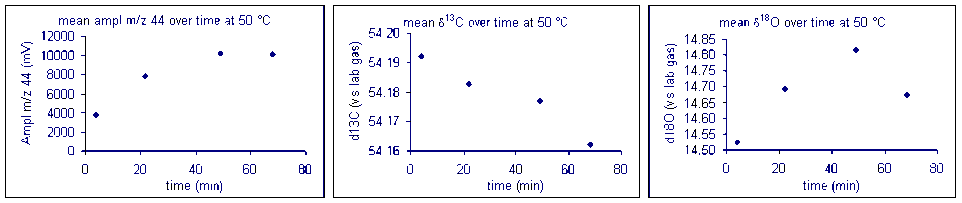
It important to check how long it will take for the CO2 from the sample to completely evolve and for the isotope ratios to stabilize. We checked the reaction time between 50 and 80°C and found that for all of these temperatures one hour was sufficient for our marble standard (data shown below). However, when a similar experiment was performed for a bone standard, we found that a 6 hour reaction time was preferred.
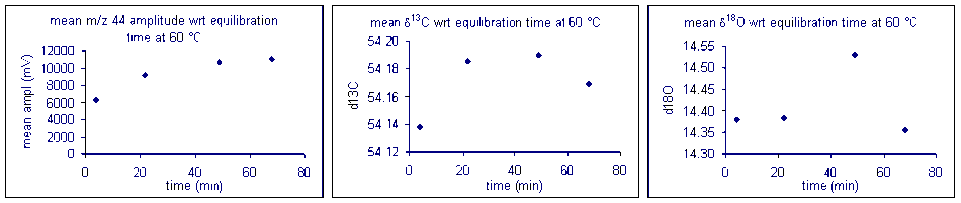
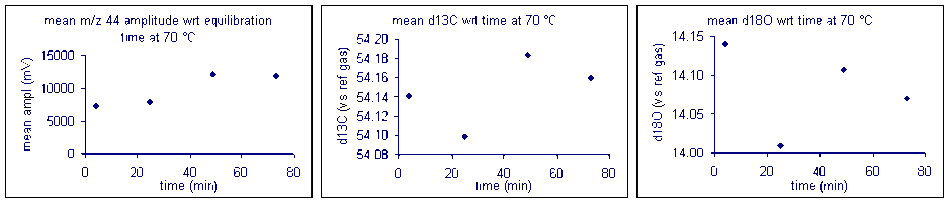
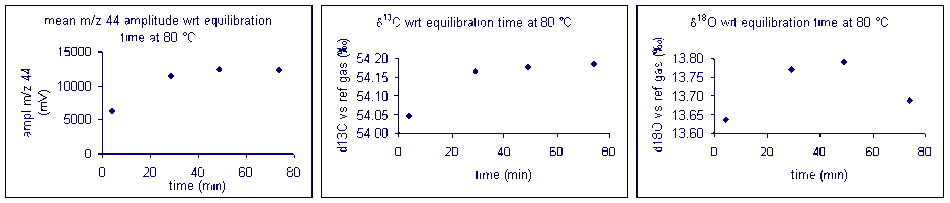
Equilibration time: marble
Bone
Here are the results of a test of required reaction time for bone at 70 °C. Note that although there appears to be a sudden drop in δ13C after about 200 minutes, the range of measured values for the entire data set has a standard deviation of about 0.1‰. For oxygen isotopes, there is one point around 100 minutes where there is a significant deviation from the rest of the samples. Excluding that point, the standard deviation for the rest of the samples over the entire range of reaction times is about 0.15‰. Allowing a 6 hour reaction time here simply ensures a maximized signal but not necessarily a significant improvement in the accuracy of the measured isotope ratio of the sample.

Temperature
Here is a summary of the effect of reaction temperature on the measured isotope ratio of sample relative to the tank gas.
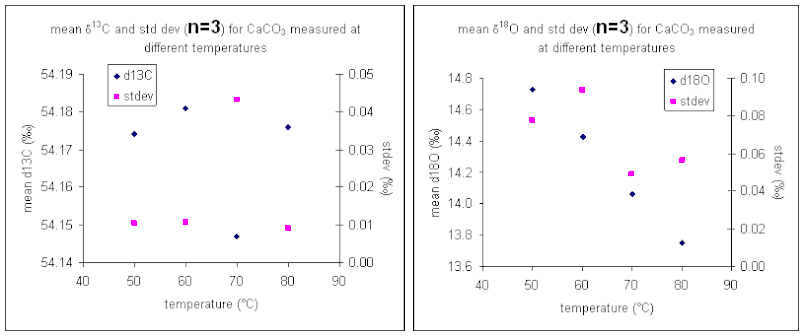
The reaction temperature did not significantly change the measured δ13C for our carbonate working standard. However, there was a significant effect on the measured d18O of the working standard, as seen in the right plot above. The measured oxygen isotope ratio for the carbonate changed by about 1‰ over a 30 °C range. Hence, we can assume a variability in the value of about 0.03‰/°C. Since the multiprep heating block is stable to about 0.1°C it does not seem that temperature stability of the heating block will be much of a concern for routine operations. (That is not the case for isotope ratio measurements of waters by equilibration with the multiprep.)
V. Data Processing
The following instructions give a detailed step-by-step approach to the data processing we do. A few things to note: we are still trying to obtain laboratory working standards that cover a range of isotope ratios for normalization of the data. Until that time, we will use NBS-18, NBS-19, and at least the "beijing standard" that we currently have for data processing. The following data set is for bone carbonates, hence the llama leg working standard is also used for a linearity and quality check.
1. Exporting the raw data:
In Workspace, find your data folder, sort the results by date created, highlight all of the data files of interest, right click in the highlighted area and select "reprocess".
In the reprocessing window, select "add template" and choose the "C and O" template. Then rename the filename of the export spreadsheet. It is recommended to leave the date in the file name, and then add a portion of the name with the same name as the data results folder. Now click OK and wait for isodat to finish exporting the data (this will take about 10 minutes for 80 files).
The data presented below is all in this file. Download it and try processing the data on your own to get the idea of what is involved in processing the results.
2. Go to the results folder and find your data. Open the excel file with the exported results. (Download the raw data for this demonstration here)
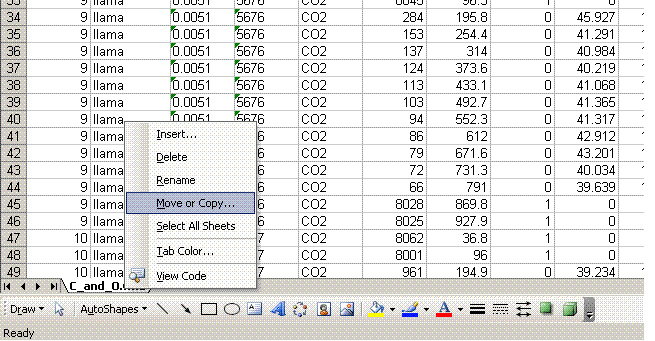
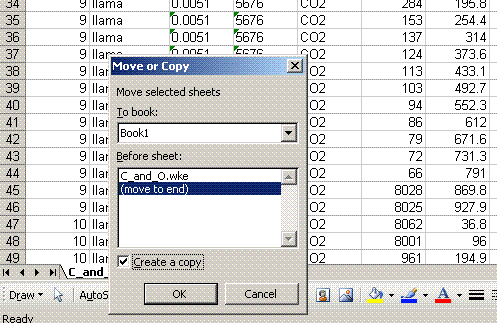
3. Before doing anything else to the data, right click on the worksheet tab (bottom of page) and select "move or copy". In the window, select "move to end" and check the "make a copy" box. Rename the copied worksheet "1". Every time you make several changes to the worksheet, you should make a new copy of it and increment its name by one. This will make it enormously easier to find errors in the data processing later on, should there be any problems.
4. In worksheet "1", highlight the "isref" column and sort the data by this value (click on the "A to Z" sort button).
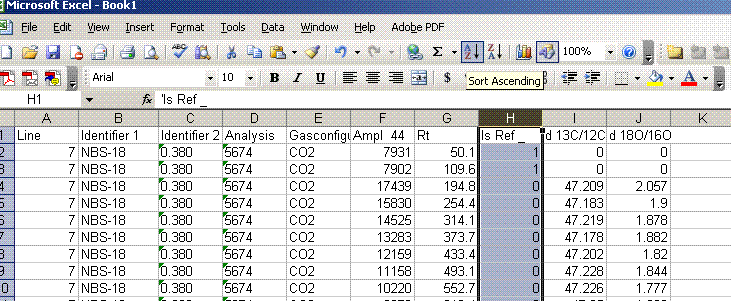
5. Scroll down to the point where the isotope ratios (values in far right columns) all start reading "0". This is where the reference gas peaks have been sorted. Insert 5 lines to separate the reference gas peaks from the sample peaks
6. Scan through the column with the peak heights to see that they are all about the same. You are looking for any obvious deviations, usually more than half a volt more or less than the normal value. If you find such a deviation, open the data file corresponding to this file and try to see what happened. Although very rare, we have seen surges or dips in the reference gas peaks. This step is just a quick check for any oddities that might result in a bogus measurement for the sample or standard isotope ratio.
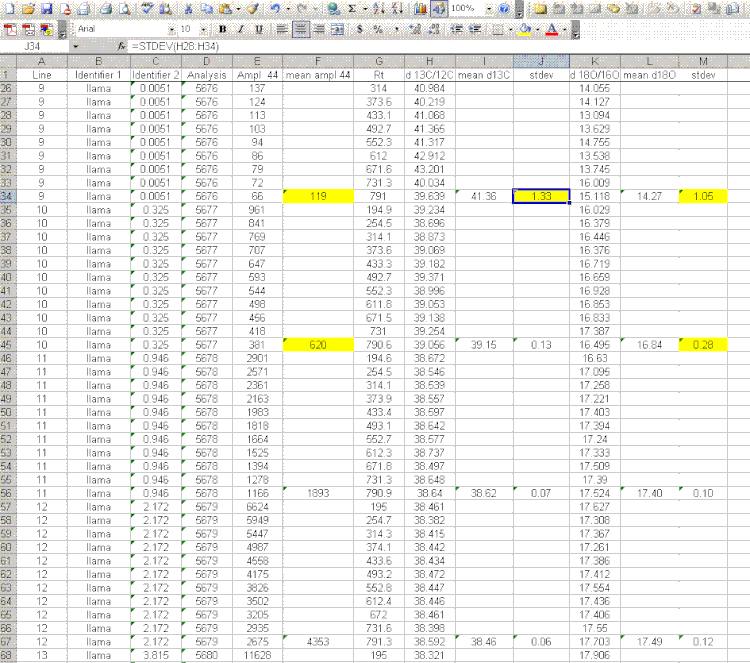
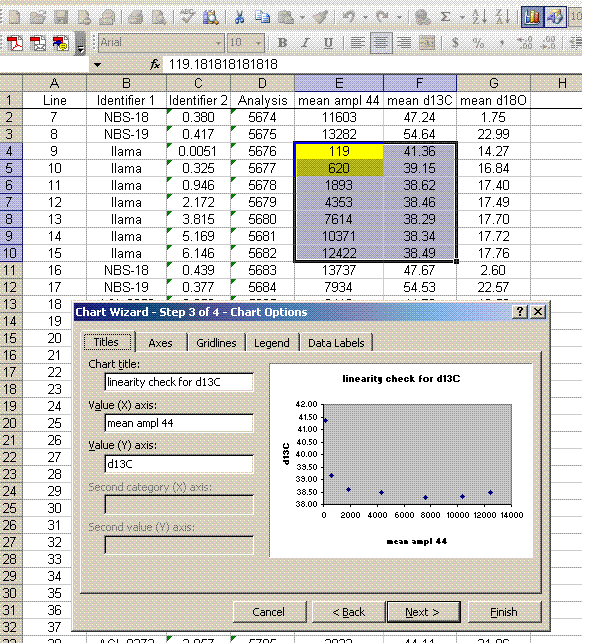
7. Insert a column after the "ampl 44" column and label it "mean ampl 44". Insert two columns after the δ13C column and call them "mean δ13C" and stdev. After the δ18O column, add headers to the following two columns: "mean δ18O" and "stdev" (see picture below). Calculate the average peak amplitude for the run in the "mean ampl 44" column.
8. Calculate the mean δ13C value and the standard deviation only for peaks that elute after 400 seconds. We have noticed that the peaks eluting before 400 seconds are not as stable as those eluting later. The reason for this is not clear so for the time being we only use the more reliable peaks occurring after 400 seconds. Do this also for δ18O and its standard deviation. Be sure to set the displayed precision in the cells to two digits past the decimal. At the moment this is more of an esthetic thing, but later on we will want to be sure to display a realistic precision in the final results.

9. Scan the calculated standard deviations for δ13C and δ18O and flag any that are greater than 0.2‰. Note that the first "linearity check" standards will have a very low signal, which will result in poor precision so do not be shocked if these are high. For any samples or standards that have high standard deviations (use 0.2‰ as your cutoff between good and bad standard deviations), look through the results and try to see if there is one particular peak that is throwing the results off. If so, then go back to the original data file to see if the baseline was correctly determined for the peak in question. In general, if there is a δ18O value that deviates significantly but the δ13C value is not so significantly changed, then there is probably a noise spike on the m/z 46 trace affecting the baseline determination for that trace. If you see a poor δ13C peak, but the δ18O data look good, then the faulty baseline is most likely with the m/z 45 trace. If both are very bad then there may be two spikes, or all traces may be bad. Regardless, you should find a clear and obvious reason for why the value deviated as it did (and consequently is not representative of the sample) so that you can drop that one value from the integration. If you cannot find a reason for the deviation then you are obligated to keep the data point. You should speak to the lab manager to see if he/she can help to figure out what may have gone wrong. If all of the peaks seem to vary a lot, look at the mean peak intensity. If it is relatively low (say, below 2 volts) then poor precision can be expected due to the sample size. In general, when you see seemingly odd results, you should check with the lab manager to see if they can help.
Here is an example of a data file in which a dip in the m/z 46 trace resulted in an incorrect determination of the baseline for that trace. If you look at the columns for the results, the highlighted one shows not significant difference in the determination of δ13C for this peak, however, the measurement for δ18O is high by about 0.4 to 0.5‰ as one would expect for a baseline that artificially increases the peak are for a single trace.
next image missing on kfleb
10. Now copy the worksheet to a new worksheet and call that one "3". In the new worksheet, highlight all of the data, copy it, and then select edit > paste special > values. From here, sort all of the data by the mean δ13C so that you can remove all of the extra data.
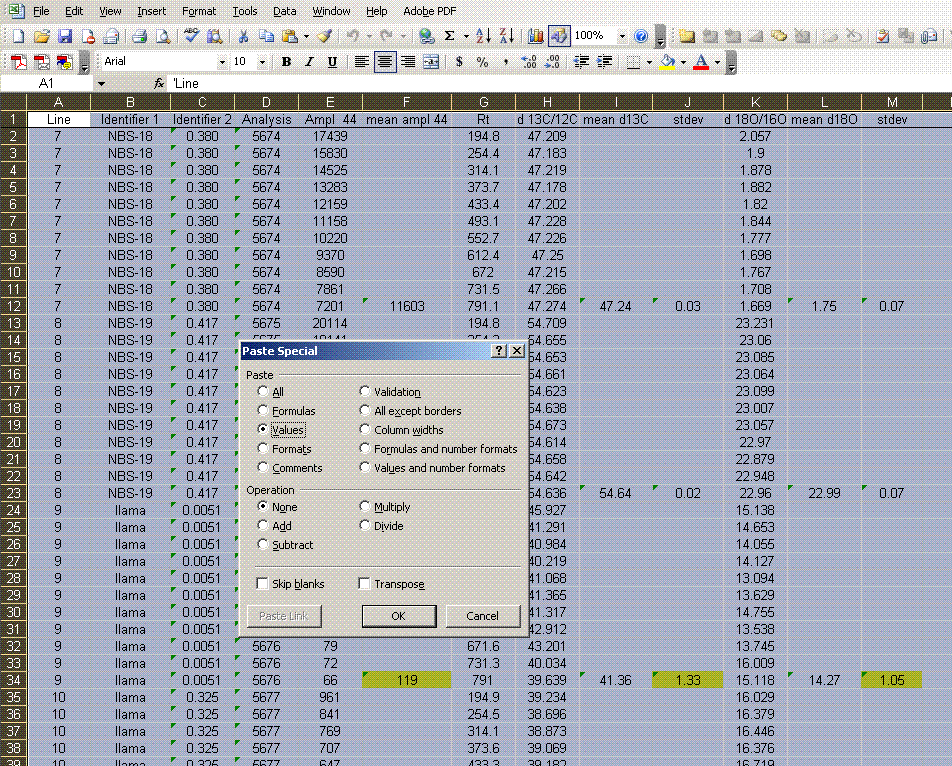
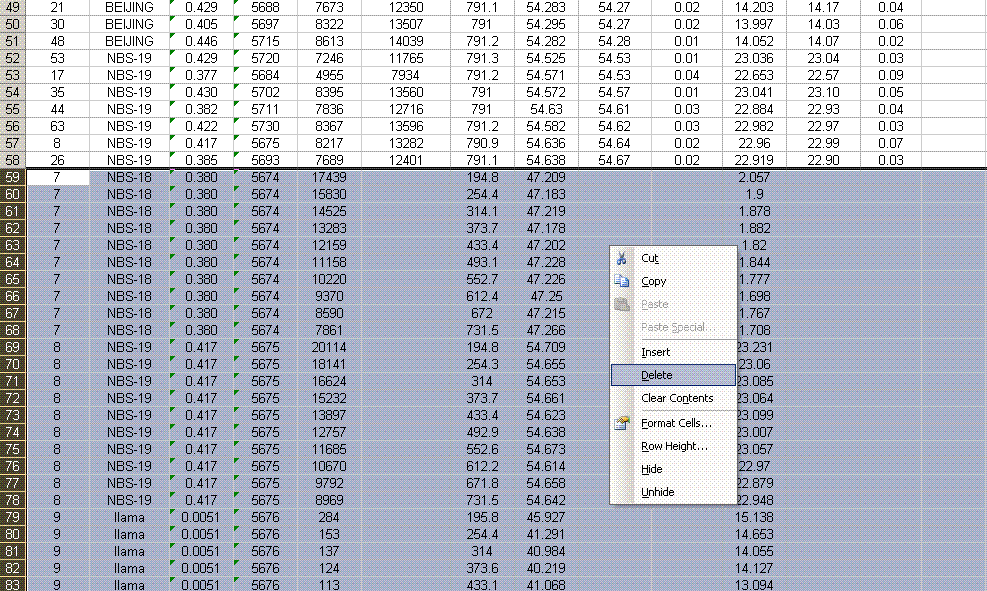
11. Sort the data by "line" (column A). Delete the columns labelled "Ampl 44", "d13C/12C", "stdev", and "d18O/16O". Be sure that you do NOT delete the columns with headers starting with the word "mean". See the picture below for what you want:
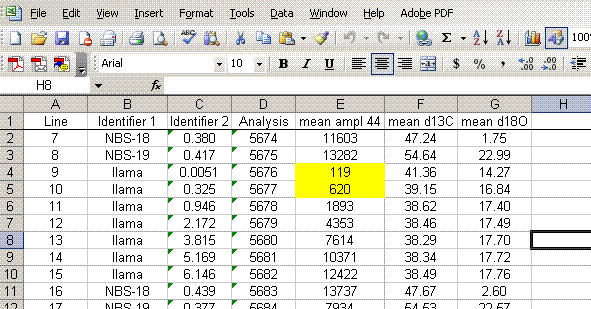
12. For the linearity standards (the llama standards in this case), plot "d13C" as a function of "mean ampl 44" (highlight the data, click on the chart wizard, and select "xy scatter"), do the same with the d18O. As a good habit, add the title and label the axes. It is recommended to remove the gridlines and legend as well.
The linearity plots below show that for mean peak amplitudes below about 2 volts there is a significant change in the measured isotope ratio. It is best to prepare samples so that the measured peaks are within a less variable part of the linearity range.
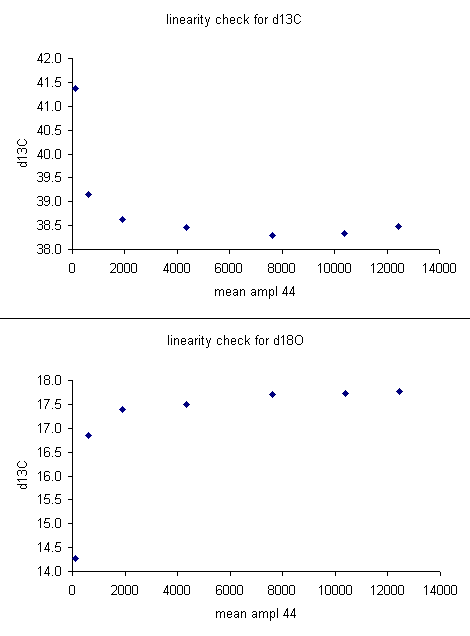
For the data set here, all sample peaks were above 2 volts, so we can check the linearity in the range that is above 2 volts, as shown in the second set of plots below where the first two linearity points were dropped. Frequently a line correction is sufficient, but sometimes a quadratic fit is much better, as in the case for d13C below.
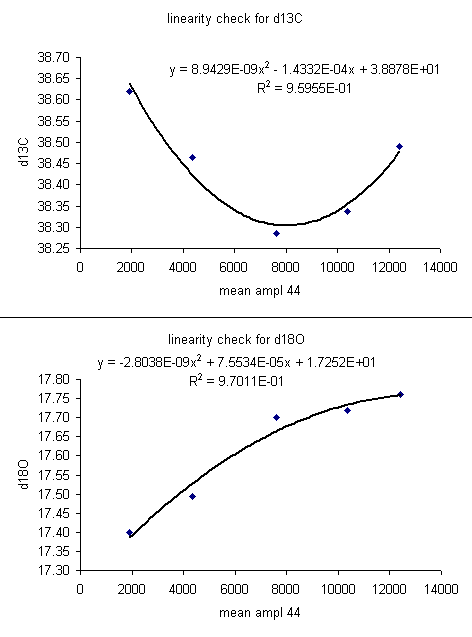
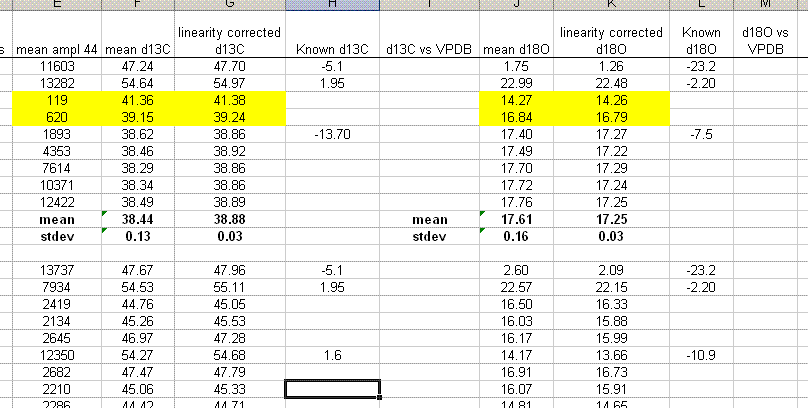
13. The linearity plots show that the measured isotope ratio varies as a function of the peak amplitude. There are two solutions to the problem of measurement linearity: prepare all samples and standards so that they all have the same peak height (this is the ideal but frequently impractical solution), or subtract out the linearity effect by using a best line or polynomial fit. To correct for the linearity, insert a few columns in between the d13C and d18O columns as shown below. Title the new column "linearity corrected d13C" and do the same for d18O. Now, subtract out the amplitude-dependent linearity effect from the measured value. Do not use the intercept from the line or polynomial equation (see the formula used in the sheet below).

The formula in cell G2 above is: "=F2-(8.9429e-9*E2^2-1.4332e-4*E2)". Note that we put the fomula for the linearity curve in parentheses to avoid any sign errors. You always subtract off the effect. Also note that the intercept with the y-axis is not used in the correction as it is only relevant to the particular sample used for the linearity correction.
Where F2 is the "mean d13C" and E2 is the "mean ampl 44". It is important to note that the linearity correction can only improve the precision for the linearity standards. So... to ensure that the correction was applied correctly, check that the standard deviation for the linearity correction points used improves (see next figure).

Note that without a linearity correction, the standard deviation for d13C and d18O of the 5 lama standards above 2 volts is 0.13 and 0.16‰ respectively. That is quite good precision for samples with peak heights varying over a 10 volt span. By using the linearity correction, we hope to make a relatively small (about 0.1‰) gain in precision and accuracy of our measurements. Notice that the standard deviation for each measurement has dropped to 0.03‰ with the linearity correction. Although this precision seems fantastic, it is artificial in that it is the result of fitting a curve through these data. Consequently, this standard deviation does not reflect upon the analytical uncertainty for sample measurements. The best measurement of sample uncertainty is to perform multiple measurements of the same samples. In general, the user should have a minimum of one set of triplicate runs of a sample in any given sequence. The more replicates, the better one can estimate the uncertainty of the final value assigned to each sample.
14. Normalizing the results: Copy worksheet "3" into a new worksheet and call it "4". Delete the plots for the linearity correction and create the columns shown below. Add the "known" values for the standards. There are two standards that will be used to normalize the results. In this case it is NBS-18 and NBS-19. These are great for our d18O measurement but less than great for our d13C measurements as they do not span a wide range of d13C values. We have ordered the LSVEC standard from IAEA which will solve that problem for us.
15. Plot (use xy scatter plot) the "known" values as a function of the linearity corrected ones for the normalization standards (the NBS-18 and NBS-19 in this case). Only use the high/low standards dedicated for this measurement. The other standards will be measured as checks. Be sure to get rid of the gridlines and legend as well as add in a title and label the axes as shown below.
Continue to normalize all of the oxygen results as well:
16. Copy worksheet 4 into a new worksheet and call the new worksheet "results". In the new worksheet, cilck on the empty box to the left of column A and just above line 1 to highlight all of the contents of the worksheet. Now do Paste Special > Values in order to remove the equations used for normalization. Delete all of the plots in the "results" worksheet.
17. From here, we want to sort all results by identifier 1, then separate out the standard and samples. To prepare for this, delete the spacer column between the C and O results (column J in the figure above). Also, copy the name of the linearity check standard down into the two columns below it so that the associated mean and standard deviation will have a value for identifier 1 (see figure below). Now highlight the column for identifier 1 and sort, using the "A to Z" option.
18. Insert 10 lines at the top of the worksheet and prepare column headers shown in the figure below. Although we report the standard deviation for the linearity check standard, it is only to see how well the linearity fit was. This value should not be misconstrued to reflect the expected precision for the samples as it is the result of a best fit line. The best test of sample uncertainty is to run replicates. In the results summary below, the standard deviation for the triplicate runs of "spl-29" would be used as the best estimate of uncertainty for the rest of the samples that were run a single time.
Be sure to paste the values for the means and standard deviations from the standards into the appropriate cells shown below. If you copy a formula into the cell you will lose the value when you delete the extra data.
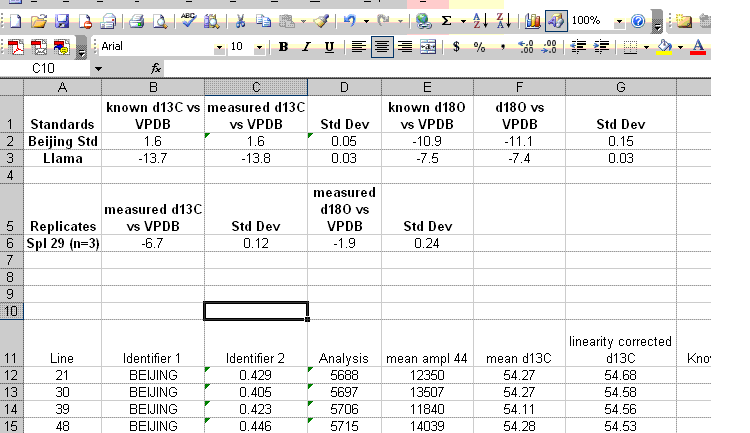
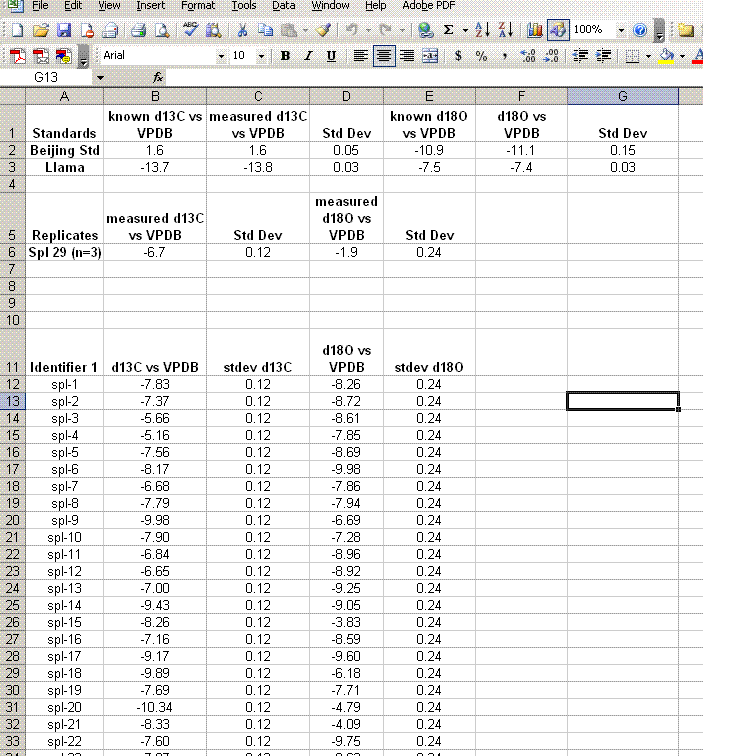
19. Clean up the results data to show only the carbon and oxygen isotope ratios as well as the analytical uncertainty estimated from the triplicate run of spl-29. Delete the extra columns and data until you have a nice clean summary like the one shown below. The values measured for the check standards (beijing and llama in this case) will give an estimate of the sample accuracy. The standard deviations obtained for the replicate sample measurements will give a better idea of the precision of the measured value for the samples.
Aside: In the data file used for this demonstration, the measured δ18O for the NBS-18 standard was unusually variable (spanned a range of about 0.8‰ through the run). Although the precision for the oxygen isotope measurements is still reasonably good, better precision would have been obtained if the standard had been more homogenous.